Introduction
Half-used caulk tubes have a talent for vanishing and spoiling at the same time. They roll to the back of a shelf, lie on their sides in a box, and grow a plug of cured sealant in the nozzle — so the ten-minute resealing job starts with twenty minutes of hunting, digging out plugs, and sometimes opening a fresh tube because the old one cannot be found or saved.
Lying loose hurts tubes in quieter ways, too. The nozzle cap goes missing, tubes of white kitchen sealant mingle with clear, brown, and paintable caulk that all look identical in poor light, and nobody can tell which tube was opened last spring and which has been open for years.
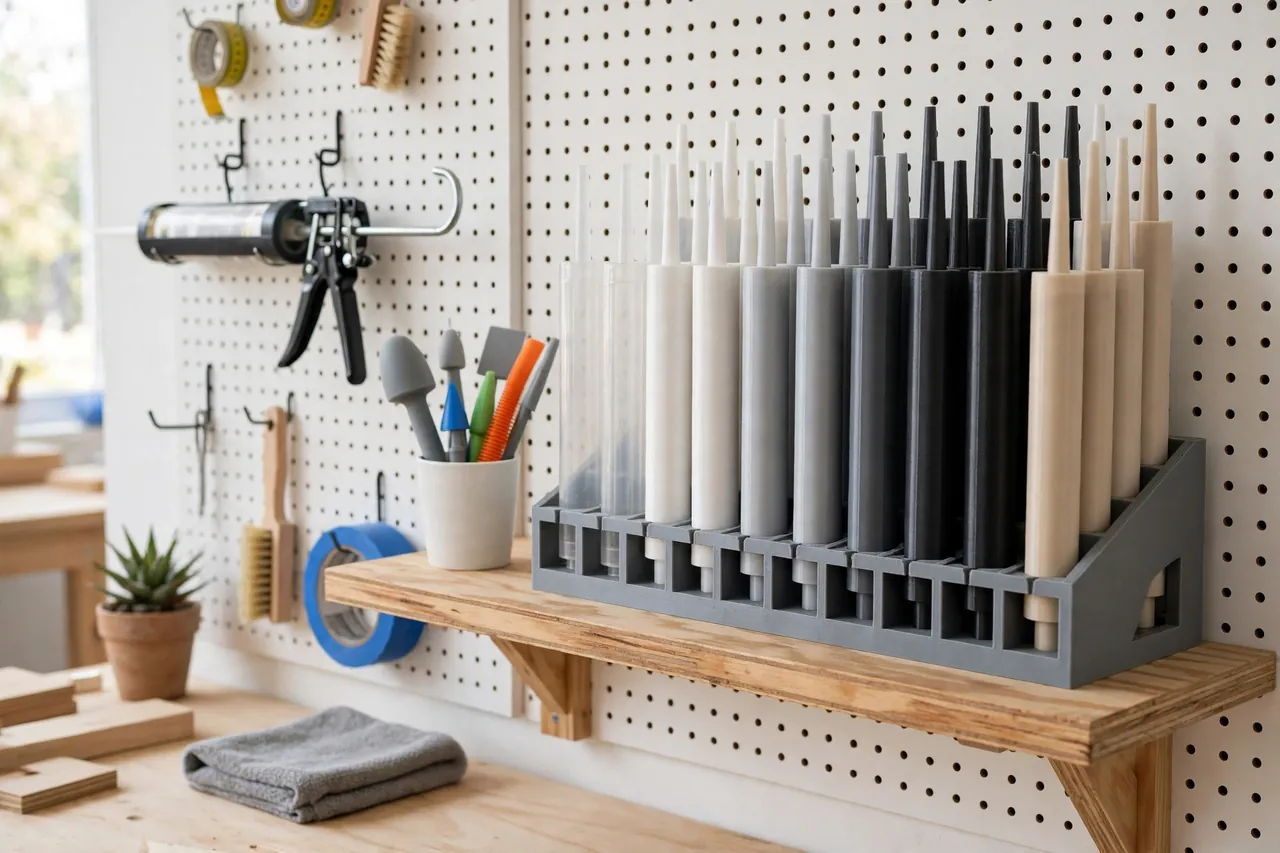
A 3D printed caulk tube rack parks every tube upright in its own hole, nozzle up, cap on, in a sorted row you can read at a glance. White with white, clear with clear, oldest at the front. The right tube is in your hand in seconds, and it still works when you pick it up.
This guide covers designing, printing, and stocking a rack for standard caulk and sealant tubes. It is a plain storage holder — holes in a frame — but it protects the one thing that decides a tube’s fate: the seal at its nozzle.
What You Need
The rack is a top plate with a row of holes, supported above a base so tubes stand at full height.
Materials and tools
- A home 3D printer with a build area of roughly 180 mm in at least one direction
- PETG filament for a rack that wipes clean of drips, or PLA for a first version
- Your actual caulk and sealant tubes, in the sizes you buy, for measuring
- Calipers or a tape measure for tube body diameter and length
- Sealing caps for your tubes — printed or the caps saved from earlier tubes
- A small file or sandpaper for easing hole edges
- A paint pen for marking tube types and dates on the rack face
PETG is the better keeper in a working rack: stray sealant smears wipe off it more easily, and it tolerates garage temperature swings. PLA prints the test plate crisply and is fine in an indoor cupboard.
Suggested print settings
- Layer height: 0.20 mm balances speed and clean hole walls.
- Walls: At least 3 to 4 perimeters around the top plate — the ligaments between holes do the work.
- Infill: 25 to 35 percent, grid or gyroid, so the plate stays flat under a full row.
- Top and bottom layers: 4 or more, keeping the plate face smooth and easy to wipe.
- Orientation: Print the top plate flat, face up, for the truest holes.
- Supports: Side supports and base print separately and need none if kept simple.
Print one short test section with two holes first, and check your fattest and slimmest tubes in it before printing the full rack.

Design Considerations
You can model this rack in any basic CAD program. A holed plate, two side cheeks, and a base are the whole machine — sizing and spacing carry it.
1. Hole diameter from your own tubes
Standard caulk tubes are roughly 46 to 50 mm in body diameter, but brands and “small project” sizes differ, so measure the tubes you actually buy at the body, not the nozzle. Give each hole about 1.5 to 2.5 mm of clearance: tubes drop in and lift out one-handed, yet stand straight instead of leaning at angles that stress the nozzle cap.
2. Nozzle-up storage with room for caps
Tubes stand nozzle-up in this design for two reasons: the cap stays visible, so a missing cap is obvious, and any slow seep stays at the sealed end instead of migrating. Leave enough height above the plate — and enough clearance between rows if you print a double rack — for caps, including longer nozzle caps and extension tips parked beside their tube.
3. Sorting stamped into the layout
Group the holes by tube family: general white, clear, paintable, and exterior or specialty tubes each get a section, with a gap between groups. Mark the plate face by each section with a paint pen. Sorting that lives in the rack’s layout survives a hurried tidy-up; sorting that lives in your memory does not.
4. A front spot for caps and tools
Add a shallow tray or a couple of small pegs at the front of the base for spare caps and the pin or tool you use to open a tube. Caps that have a home stop disappearing, and a tube returned without its cap — noticed because its neighbors all wear theirs — gets capped before it cures shut.
Step-by-Step: Printing and Assembly
- Measure your tubes — body diameter and overall length, for every size you stock.
- Model the top plate with holes grouped by type, sized with your settled clearance.
- Print a two-hole test section and stand your tubes in it, checking the fit and upright stance.
- Adjust if needed. Leaning tubes want 0.5 mm less clearance; sticky fits want 0.5 mm more.
- Print the full plate, sides, and base in PETG with the settled dimensions.
- Clean it up. Ease every hole edge so tube labels never catch or tear on the way in.
- Assemble and set it on the shelf, plates level, and confirm a full row lifts out one tube at a time.
If the full rack exceeds your build area, print the plate in two sections with a simple overlapping joint and join them on the base — the tubes will never know.
Step-by-Step: Using the Rack
- Cap every tube before it goes back — wipe the nozzle, fit the cap snugly, every single time.
- Park each tube in its section, nozzle up, label facing forward where the layout allows.
- Date opened tubes with a small mark on the rack face or the tube shoulder, so age is visible.
- Work front to back within a section: the oldest open tube of a type sits at the front and gets used first.
- Open new tubes into the back of their section, behind the one already in service.
- Keep one tube per hole. A tube balanced on top “for now” falls, uncaps itself, and starts the old mess again.
- Retire cured tubes promptly. A tube that has gone hard in the body leaves the rack and frees its hole.
- Restock by the gap. An empty hole in a section is your shopping list, written in plastic.
Used this way, tubes stop expiring in hiding — every tube in the rack is findable, datable, and sealed.
Tips for Better Results
- Save every cap you ever get. A small stock of spare caps in the front tray rescues tubes whose cap cracked or vanished.
- Color the sections. Printing group dividers or end cheeks in different colors makes the sort readable across the room.
- Face labels forward. A quarter-turn habit when parking a tube makes the whole row readable at a glance.
- Keep extension nozzles with their tubes, parked in a spare hole in the same section rather than loose in a drawer.
- Do a seasonal pass. Twice a year, squeeze-test the row; tubes firm in the body are done, wherever the date says.
Common Mistakes to Avoid
- Holes sized from a nominal tube diameter. Tube bodies vary by brand; measure yours before modeling.
- Storing tubes nozzle-down or loose on their sides. Caps go missing, seeps migrate, and the sorting dissolves within a month.
- Parking an uncapped tube “just overnight.” Overnight is exactly how long a nozzle plug needs to form.
- One undifferentiated row. White, clear, and paintable tubes look near-identical; without sections, you will grab the wrong one under time pressure.
- Keeping ancient tubes out of optimism. A rack makes age visible — act on it and retire what has cured.
Care, Storage, and When to Choose an Alternative
Wipe sealant smears off the plate before they cure hard, and brush dust out of empty holes when you restock. Check side cheeks for cracks at restock time; a section reprints in an afternoon. Store the rack where tubes live best — a steady indoor temperature, out of frost and fierce heat — and the sealant inside will hold its shelf life far better than it ever did in a box.
If you own exactly one tube, it can live in the caulk applicator and this rack is overkill; if you run a trade van, molded commercial racks may suit the knocks better. The printed rack wins for the common middle: half a dozen household tubes that deserve sorting and sealing. It completes the set described in our related guide, “Caulking Helper Tools: 3D Print a Caulk Tube Holder, Cap and Smoothing Profile Set,” whose caps are exactly what this rack keeps track of.
FAQ
Why nozzle-up rather than nozzle-down?
Nozzle-up keeps the cap visible — a missing cap shows instantly — and keeps the seal at the top where you can check it. Either orientation beats lying loose, but up makes the inspection habit effortless.
Can the rack hold both standard and small tubes?
Yes, with a section of smaller holes sized to the small tubes. Measure them separately; small tubes in standard holes lean badly, stress their caps, and hide behind their taller neighbors.
How long does an opened tube last in the rack?
That depends on the sealant and how well it was capped, which is exactly what the rack improves. A well-capped tube parked upright and dated commonly stays workable for many months; the rack’s job is making sure the cap, the date, and the tube are never separated.
What about tubes for a sausage-pack or bulk applicator?
Those formats do not suit a tube rack — store them flat in their box, cool and dry. This rack is designed around rigid standard tubes standing on their bases.
Conclusion
Caulk tubes spoil in hiding: uncapped, unsorted, and lying where they rolled. A printed rack stands them upright in grouped holes, caps visible, dates showing, oldest at the front — and the whole resealing job speeds up before the applicator even comes out.
Measure your tubes, print a test section, and give every type its own group of holes. The next tube you reach for will be the right one, and it will still flow.
For the reach that rack cannot give you, you may also enjoy our related guide, “Caulk Tube Extension Nozzles: 3D Print Long-Reach Tips for Awkward Seams,” and for the bottles that share the shelf, see “Glue Applicator Tips and Caps: 3D Print Precision Spouts for Your Workshop Glue Bottles,” which applies the same sorted-and-sealed thinking.