Introduction
Spare keys have a special talent for disappearing. The shed key lives in a jacket pocket. The cabinet key is taped inside a drawer. The padlock key for the side gate is, famously, “somewhere safe” — which means nowhere you can find it when you need it. Every workshop accumulates keys, and every workshop loses track of at least one of them.
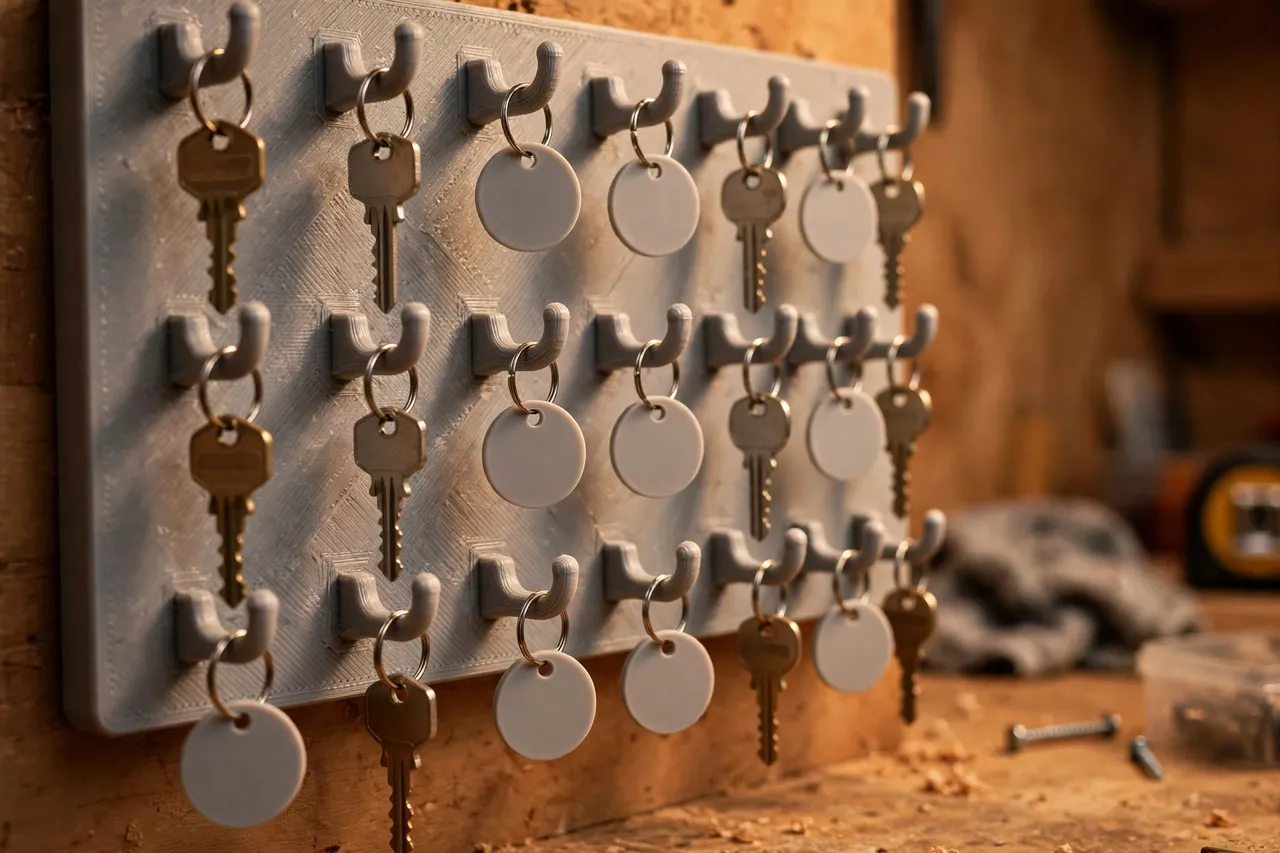
A 3D printed key storage board gives every spare key a visible, labeled home. It is a flat board with rows of hooks, mounted by the workshop door or above the bench, where each key hangs in its place. You see at a glance which keys are home and which are out, and a label under each hook tells you what the key opens — no more trying six keys in a padlock to find the right one.
A note on scope, stated plainly: this board stores spare keys for your own workshop, shed, cabinets, and padlocks. It is a storage organizer, not a security device, and it is not a substitute for proper key control. Do not hang keys to anything valuable in a place visitors can reach, do not label keys with full addresses or identifying details, and keep truly sensitive keys — the house, the safe, the car — in a proper secure store, not on an open board. Within those limits, a key board is one of the most useful small prints in a workshop.
It also belongs to the same tidy family as “3D Printed Knob and Pull Organizer: Knobs Sorted and Ready” and “3D Printed Hook and Eye Organizer: Hooks Sorted by Size” — small hardware, sorted and visible, instead of lost in a drawer.
What You Need
The board is a flat printed panel with hooks and mounting holes, printed in one piece or in sections. Wall mounting needs a few screws and plugs.
Materials and tools
- A home 3D printer with a build area of roughly 150 mm in at least one direction
- PLA filament for an indoor board, or PETG for a garage wall that gets warm or damp
- Your spare keys, plus key rings or small tags for labeling
- A tape measure or calipers, a pencil, a level, and a drill or screwdriver
- A label maker, small tags, or a paint pen
PLA is fine for a board that hangs indoors and holds light keys. PETG is tougher and handles a garage better. Keep hooks chunky either way: a thin hook that snaps drops a key behind the bench, which defeats the whole project.
Suggested print settings
- Layer height: 0.20 mm for a clean finish and reasonable speed.
- Walls: 4 perimeters, especially around the hooks, so they do not flex or snap.
- Infill: 25 to 35 percent, grid or gyroid. A key board carries little weight, but stiff walls matter.
- Top and bottom layers: 4 or more, for a flat board that sits flush to the wall.
- Orientation: Print the board flat on the bed, hooks facing up.
- Supports: A good design needs none if hooks angle upward and are kept short.
Print a short test strip with two or three hooks first and hang your heaviest key bunch on it. If the hooks hold without flexing, the full board will too.
Design Considerations
A key board fails in two ways: hooks too weak, or labels too vague. Design against both.
1. Hooks that hold
Make each hook a short, upward-angled peg or a small J-shape, about 15 to 20 mm long and at least 6 mm thick. The upward angle is what keeps a key ring from sliding off when the door slams or someone brushes past. One key or one small bunch per hook — doubling up keys hides the one underneath and makes the board hard to read.
2. Rows and spacing
Space hooks about 40 to 50 mm apart horizontally and 60 to 80 mm apart vertically. Keys are longer than they look, and tight spacing means keys overlap and tangle. Fewer, well-spaced hooks beat a dense board you cannot use. Plan for growth: leave one empty row, because spare keys have a way of appearing after every project.
3. Labels that help without oversharing
Label each hook with what the key opens in general terms: “shed,” “side gate padlock,” “tool cabinet.” Never write a full address, a person’s name, or anything that would help a stranger use a found key. For keys you rarely use, a small tag on the key ring itself, matching the board label, saves the “which key was this?” moment a year later.
4. Placement
Mount the board where keys are actually used: by the workshop door, beside the bench, or near the back door that leads to the shed. A board in a cupboard is only slightly better than a drawer. Keep it out of direct sight from outside windows, and out of reach of the front door area where visitors pass. Height matters too: mount it at eye level so labels are readable without crouching.
5. Mounting
Screw the board into studs where possible, or use proper wall plugs. A board full of keys is light, but a board that wobbles every time you take a key off it will loosen its fixings. Four fixings, one near each corner, keep it solid. If you rent and cannot drill, a bench-standing version with a small foot works, though it takes up bench space.
Step-by-Step: Printing and Assembly
- Gather your spare keys and group them by what they open, in general terms.
- Count the hooks you need and add a row for growth.
- Sketch the board layout: rows, spacing, and where labels will sit under each hook.
- Model the board about 4 to 5 mm thick, with hooks and four mounting holes.
- Print a test strip with three hooks and check key fit and hook strength.
- Print the full board, in sections joined with a simple splice if it is wider than your printer.
- Clean up stringing and sand hook tips smooth so key rings slide on easily.
- Mount the board level at eye level, in its chosen spot.
- Label every hook before hanging a single key, then hang the keys in their places.
Step-by-Step: Using It
- Hang keys the moment you get them. A new spare key goes on the board the day it is cut, not into a pocket “for now.”
- Take a key, leave the hook empty. An empty hook is the board telling you a key is out — far more useful than a drawer that looks the same whether keys are in it or not.
- Return keys the same day. A key left on the bench overnight starts a new hiding place.
- Check the board before locking up. A glance confirms the shed and gate keys are home before you leave.
- Update labels when locks change. A label that no longer matches its lock is worse than no label, because it sends you to the wrong key with confidence.
- Audit twice a year. Remove keys for locks you no longer own, and re-label anything that has drifted.
Tips for Better Results
- Color-code by area: one hook color for the garden, one for the workshop, one for the house outbuildings, so a glance tells you the zone.
- Use small tags on key rings that match the board labels, so a key found loose can be returned to its hook.
- Keep a spare hook row empty for keys that arrive with new padlocks and cabinets.
- Mount a small dish or tray below the board for keys too bulky to hang, such as large padlock keys on thick rings.
- Photograph the board once it is full, and keep the photo as a backup record of which keys you own.
Common Mistakes to Avoid
- Labeling keys with identifying details. A key labeled with a full address is a gift to anyone who finds it. Keep labels general.
- Hanging sensitive keys on an open board. House, car, and safe keys belong in secure storage, not on a workshop wall.
- Printing hooks too thin. Thin hooks snap, and a snapped hook usually drops its key somewhere hard to reach.
- Spacing hooks too tightly. Overlapping keys tangle, hide each other, and make the board slower than the drawer it replaced.
- Mounting the board where visitors pass. A key board by the front door is convenient for everyone, including people you would rather not help.
Care, Storage, and When to Choose an Alternative
Dust the board occasionally and check the fixings once a year. If a hook breaks, reprint that section or glue a replacement hook in place. Keep PLA boards out of sustained heat and direct sun; PETG suits a garage better.
A manufactured key cabinet with a lock is the right choice when keys need real security, or when you manage keys for a business, a rental property, or a shared workshop. A lockable cabinet costs more, but it controls access in a way an open board never will. For a home workshop’s own shed, cabinet, and padlock spares, a printed board is cheaper, fully visible, and easy to extend.

FAQ
How many keys can one board hold?
A board roughly 300 mm by 200 mm with hooks spaced 50 mm apart holds twenty to thirty keys comfortably. Larger collections deserve a second board, sorted by area, rather than a cramped single board.
Should I label keys at all, given the security concern?
Yes, but generally. “Shed” or “tool cabinet” helps you find the right key without helping a stranger use it. Avoid addresses, names, and anything that identifies a specific property.
Will PLA hooks hold a heavy bunch of keys?
A bunch of two or three keys is fine on a chunky printed hook. A large bunch of ten or more belongs on its own peg or in the tray below the board, not hanging from a single small hook.
Can I make the board without drilling into the wall?
Yes. Print a bench-standing version with a foot, or use removable adhesive strips rated for the board’s weight on a smooth surface. Both are weaker than screws, so keep the board light and check the fixings regularly.
Conclusion
A key storage board is a small print with a daily payoff: every spare key visible, labeled, and in the place you expect it. Print sturdy hooks, space them generously, label generally rather than specifically, and mount the board where keys are actually used.
Do that, and the next time you need the shed key, you will reach for the board — not search a jacket, a drawer, and a coffee can first.