Introduction
Shop vac accessories have a habit of migrating. The floor nozzle ends up behind the vacuum, the crevice tool falls behind a shelf, and the extension wands lean in a corner where they get knocked over and cracked. When you need the right nozzle, you spend longer finding it than using it — and the vacuum itself becomes less useful because its accessories are scattered.
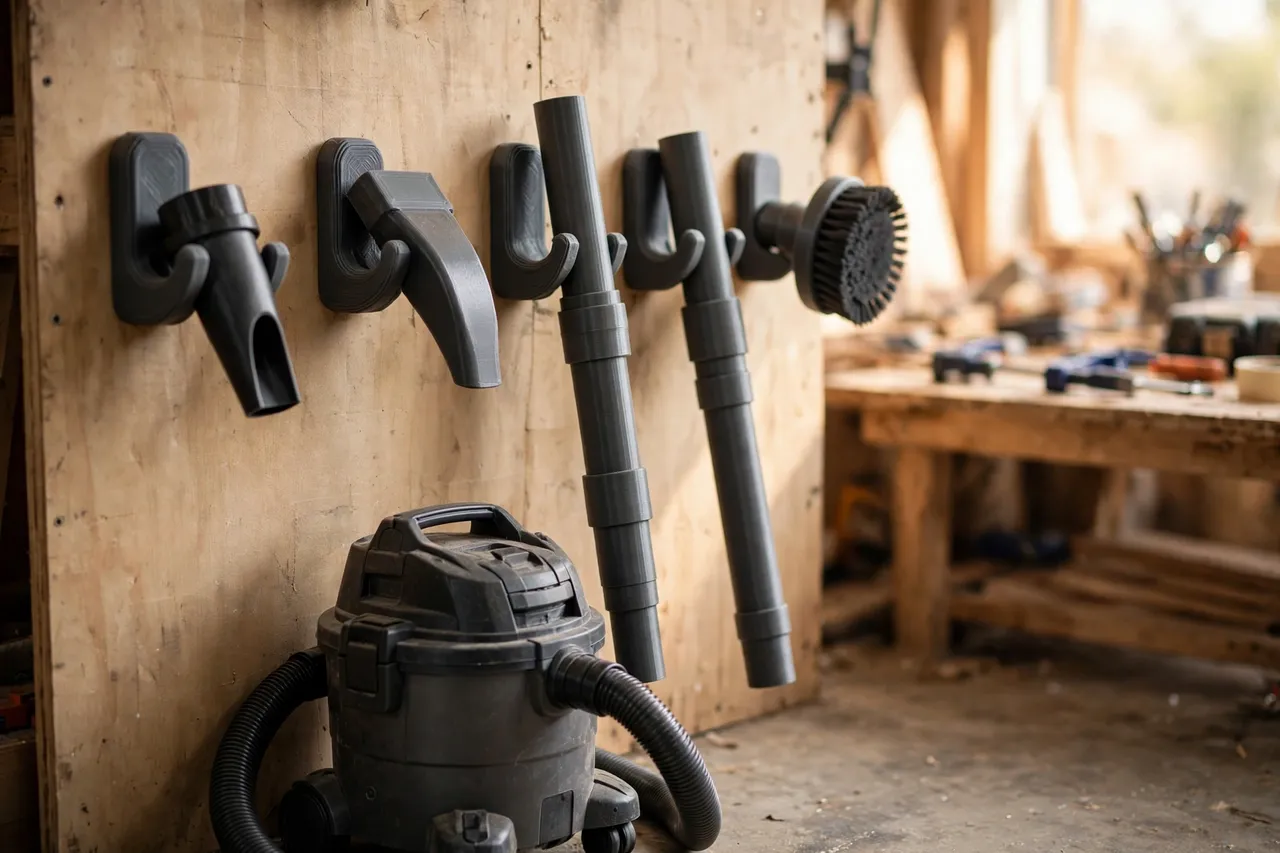
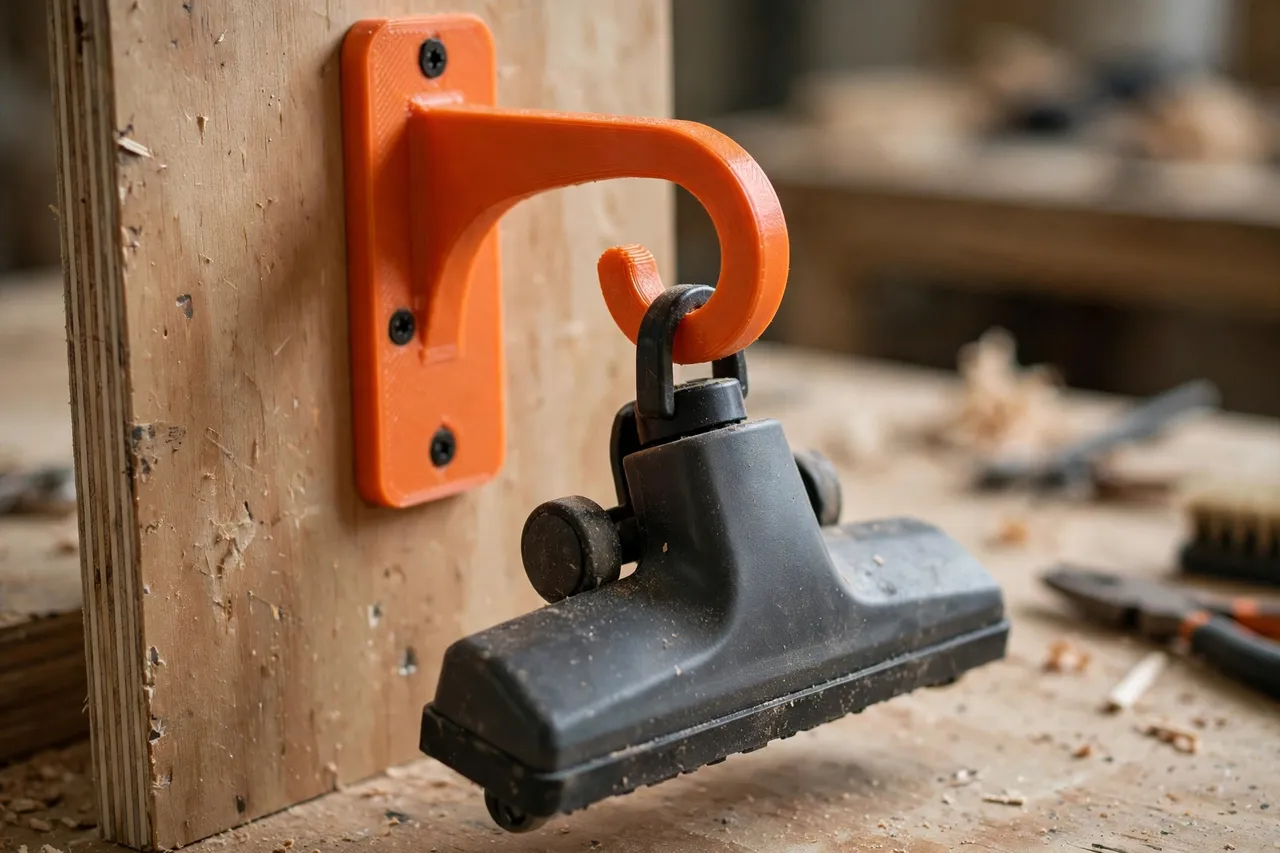
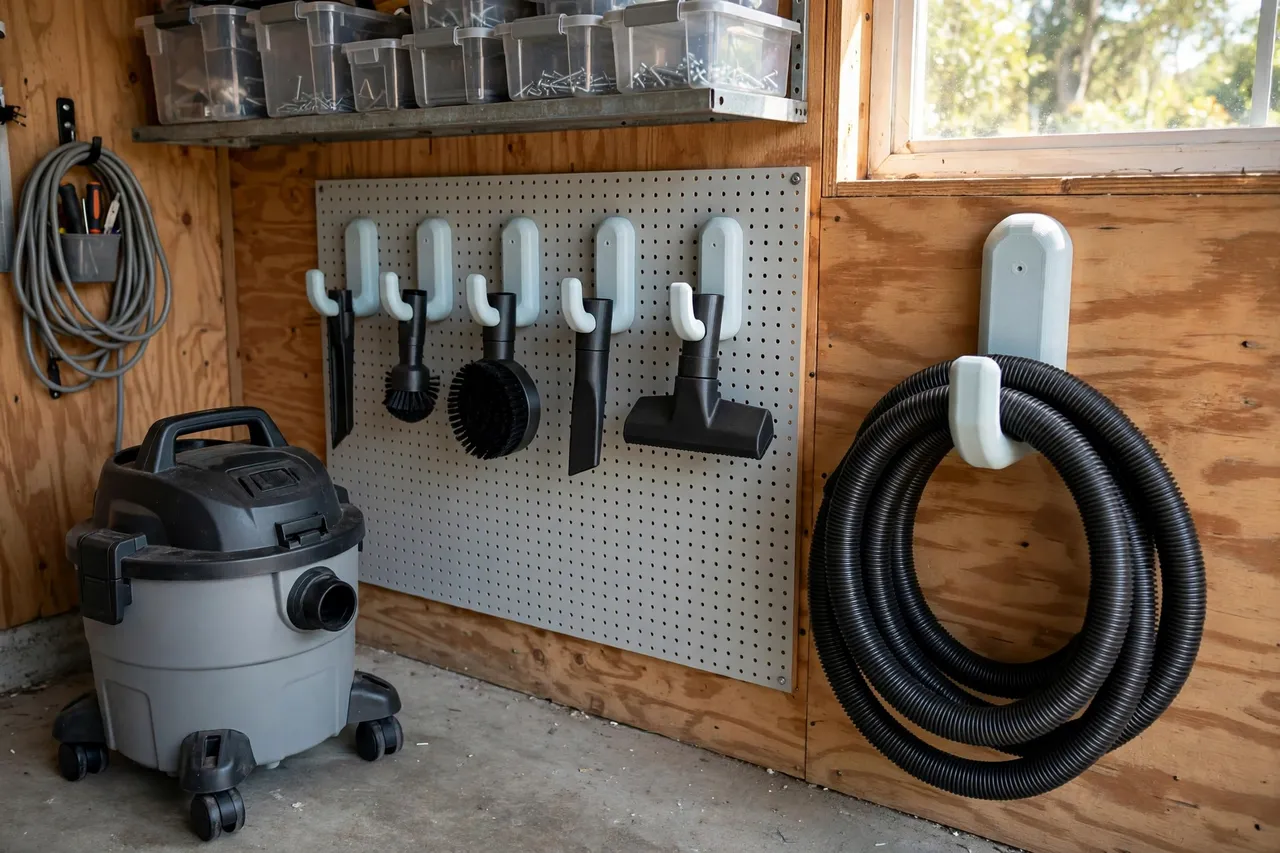
A set of 3D printed wall hooks fixes this by giving every nozzle, wand, and brush a visible home in one row. Unlike generic hooks, printed hooks can be shaped for each accessory: a wide cradle for a floor nozzle, a narrow fork for a crevice tool, a pair of spaced hooks for long wands. Mounted on a board beside the vacuum, they turn a scattered collection into a tidy kit you can see at a glance.
These hooks hold light vacuum accessories only — nozzles, wands, brushes, and hoses. They are not for heavy tools, they are not load-rated, and they should never be used to hang the vacuum itself or anything heavy overhead. For accessories, though, they are ideal: cheap, custom, and easy to rearrange as your accessory collection changes.
What You Need
Accessory hooks are simple, chunky prints. The main task is measuring your nozzles and wands, not learning a new skill.
Materials and tools
- A home 3D printer with a build area of roughly 120 mm in at least one direction
- PETG filament for garage use, or PLA for a cool indoor workshop
- A board to mount hooks on: plywood or a pine offcut, long enough for your accessory row
- All your shop vac accessories, laid out and measured
- Wood screws, a drill or driver, a pencil, a spirit level, and sandpaper or a small file
- Wall anchors if fixing the board to drywall rather than studs
PETG is the better garage choice because it tolerates temperature swings and the occasional knock. PLA is fine indoors for light nozzles, but a PLA hook in a hot garage can soften over a summer.
Suggested print settings
- Layer height: 0.20 mm, or 0.24 mm for large, chunky hooks where speed matters more than fine detail.
- Walls: 4 to 5 perimeters, so hook arms stay stiff under a wand’s length.
- Infill: 40 to 50 percent, gyroid or grid.
- Top and bottom layers: 4 or more.
- Orientation: Print flat on the back plate, hook arm pointing up, for the strongest arm.
- Supports: Usually none for simple upturned hooks; add supports only for deep fork shapes.
Print one hook for your widest nozzle first, test it, and then print the rest of the row to match.
Design Considerations
Vacuum accessories differ more than most tool collections: a floor nozzle is wide and flat, a crevice tool is long and narrow, wands are long tubes, and brushes are somewhere in between. One hook shape will not serve them all.
1. Match the hook to the accessory
Design three basic shapes and reuse them. A wide U-cradle, about 80 to 100 mm across, suits floor nozzles hung by their neck. A narrow fork or slot suits crevice tools and brush heads hung by their tube. A pair of spaced hooks, about 300 mm apart, supports a long wand at two points so it does not bow or slide. Measuring the neck or tube diameter of each accessory — usually 32 mm or 35 mm for common shop vacs, but check yours — keeps the fit snug without forcing.
2. Standoff and clearance
Hooks need enough standoff from the board — 50 to 70 mm — that a wide nozzle hangs clear of the wall and does not press against it. Spacing matters too: allow 120 to 150 mm between nozzle hooks so wide heads do not overlap, and keep wand hooks far enough apart that wands hang parallel rather than crossed.
3. Back plates and board fixings
Each hook needs a back plate with two screw holes, countersunk so heads sit flush. Fix hooks to a board first, then fix the board to studs with screws long enough to bite solidly. A board spreads the load and lets you move the whole row later without patching a dozen holes. For drywall alone, use proper anchors rated for the board’s weight plus accessories.
4. Hose storage, separately
Do not hang a heavy hose from a nozzle hook. Give the hose its own large, wide hook or a coiled holder, printed thickly and fixed to a stud, so its weight does not drag the accessory row down. A hose coiled loosely, not kinked tightly, lasts longer and stays flexible.
Step-by-Step: Printing and Mounting
- Lay out every accessory. Group nozzles, wands, brushes, and crevice tools, and measure each neck or tube diameter and overall width.
- Size the board. Allow room for each hook plus spacing, and cut a board to suit. Sand the edges.
- Model the three hook shapes. A wide cradle, a narrow fork, and a wand hook, each with a back plate and two countersunk holes.
- Print one of each and test. Hang the real accessory on each hook. It should sit securely, lift off easily, and not press against the board.
- Clean up. Sand hook arms smooth so they do not scratch plastic nozzles, and clear screw holes.
- Lay out the row on the board. Mark positions with a pencil and level, keeping wide nozzles spaced generously and wands on paired hooks.
- Fix hooks to the board. Drill pilots and drive screws snugly, without cracking plates.
- Mount the board beside the vacuum. Choose a spot at a comfortable reach height, clear of door swings, and fix into studs or with anchors.
- Hang everything and test the routine. Use the vacuum for a week and notice whether accessories return to the board. Move any hook that keeps being bypassed closer to where that accessory is used.
A board mounted beside the vacuum, at the height where you naturally reach for a nozzle, gets used far more than one across the room.
Tips for Better Results
- Label the board lightly. A small printed tag or a pencil mark under each hook — floor, crevice, brush, wand — helps everyone in the household return accessories correctly.
- Print hooks in one colour for a tidy look. Matching hooks make a mixed collection of accessories look intentional rather than improvised.
- Leave one spare hook. Accessory collections grow. A spare hook today saves a new board layout tomorrow.
- Keep the row clear of the vacuum’s exhaust. Hot exhaust air blowing on printed hooks softens them over time. Position the board to the side, not behind the exhaust outlet.
- Dust the hooks when you empty the vacuum. A quick wipe keeps grit from scratching nozzles as they slide on and off.
If you are tidying the whole vacuum area, you may also enjoy “3D Printed Dust Mask Hooks: Hooks for Masks at the Bench,” for the mask you grab before dusty vacuum work, and “3D Printed Tool Roll Hangers: Hang Tool Rolls Flat on the Wall,” for another wall-storage idea that keeps kits visible and ready.
Common Mistakes to Avoid
- Printing one hook shape for everything. A floor nozzle on a narrow hook wobbles; a crevice tool on a wide cradle falls through. Match shapes to accessories.
- Spacing hooks too tightly. Wide nozzles need room. Crowded hooks mean accessories overlap, snag, and end up back on the floor.
- Hanging the hose from a nozzle hook. Hose weight will bend or break a light hook. Give the hose its own sturdy holder.
- Fixing the board with too few screws. A long board with accessories needs fixings into studs at both ends, not a single central screw.
- Mounting too high. Accessories hung above comfortable reach get left on the floor. Keep the row at shoulder height or below.
Care, Storage, and When to Choose an Alternative
Wipe hooks clean when dusty, check screws every few months, and replace any hook that cracks or bows. Vacuum accessories are light, so printed hooks last well — but a hook that has been knocked hard should be inspected before trusting it again.
For heavy items, choose metal hooks or brackets rated for the weight. Printed hooks are for vacuum accessories and similar light items. If you need to hang the vacuum itself, a power tool, or a loaded bag, buy a manufactured bracket fixed into studs. Within their proper role, printed accessory hooks are tidy, cheap, and genuinely habit-forming.
FAQ
Will printed hooks hold long extension wands?
Yes, if you use paired hooks spaced along the wand so it is supported at two points. A single hook at the middle lets a long wand pivot and slide. Two hooks, about 300 mm apart, hold it level and secure.
What if my vacuum uses a different tube size?
Measure your tubes and nozzles and size the hooks to them. Common sizes are 32 mm and 35 mm, but brands vary. A hook modelled on your actual accessory fits; a hook modelled on a guess may not.
Can I hang the hose on the same board?
Yes, on its own large hook, fixed to a stud. Keep the hose separate from nozzle hooks so its weight does not stress them, and coil it loosely to avoid kinks.
Is PLA okay in a garage for these hooks?
For light nozzles in a cool garage, PLA works. For a garage that gets hot in summer, PETG is safer because it softens at a higher temperature. When in doubt, choose PETG.
Conclusion
A shop vacuum is only as useful as its accessories are findable. A row of printed hooks, shaped for each nozzle and wand and mounted beside the vacuum, turns a scattered pile into a visible kit. The next time you need the crevice tool, it is on the board — not behind a shelf, not under a bench, not lost at all.
Measure your accessories, print one hook shape at a time, and mount the board this weekend. It is a small project with a daily payoff, every time you clean up.