Introduction
Painting a room is mostly waiting — and what happens to your brush and roller while you wait decides how the next coat goes on. Left flat on a tray edge, a brush dries at the tip, picks up dust, and drips where you least want it. A roller left sitting in paint flattens on one side; left out of paint, its nap dries stiff and streaky.
3D printed paint brush and roller holders solve that in-between problem with simple, washable plastic: a holder that keeps a brush upright or safely rested, a stand that holds a roller off its nap, and a small caddy that keeps the whole kit together between coats. None of them touch your finish, carry any load, or do anything clever. They just give wet tools a proper place to pause.
This guide covers a practical set of holders, rests, and stands sized to the brushes and rollers you already own, how to print them so paint washes off easily, and a between-coats routine that keeps tools ready instead of ruined.
What You Need
Measure your actual tools first. Brush handles, ferrules, and roller frames vary enough that a holder sized from memory will fit nothing well.
Materials and tools
- A home 3D printer; the holders and rests are small prints that fit any common bed
- PETG filament preferred, because it flexes instead of chipping and washes clean more easily; PLA works for a test set used indoors
- Your most-used brushes — note handle shapes, ferrule widths, and brush sizes
- Your roller frame and sleeves, plus a mini roller if you use one
- A paint can, a paint tray, and the pail or bucket you usually work from, for clip and rest fitting
- Calipers or a tape measure, plus sandpaper or a small file for easing edges
- Plastic wrap or reusable covers of your choice for longer pauses, used as your paint label directs
Suggested print settings
- Layer height: 0.20 mm for all parts; these are utility prints where fit matters more than finish.
- Walls: At least 4 perimeters on clips, stands, and any part that flexes or gets knocked.
- Infill: 25 to 40 percent, grid or gyroid. Holders need stiffness, not bulk.
- Top and bottom layers: 4 or more, so bases sit flat and paint cannot pool in layer gaps.
- Orientation: Print stands upright as used, rests and clips flat in their strongest direction, caddies base-down.
- Supports: Design to avoid them; simple slots, cradles, and rims print cleanly without.
Print one brush holder, test it with a dry brush and then during a real first coat, and only then print the full set.
Design Considerations
Design three complementary pieces: something for the brush in your hand, something for the roller between walls, and something that stores both between coats.
1. The brush holder: upright, stable, and ferrule-friendly
A good brush holder keeps the brush upright with the bristles up for short pauses, or cradles it by the handle with bristles clear of every surface. Model a wide, low base that will not tip when a top-heavy brush leans, and slots or cups sized to the handle rather than the bristles — bristles should never be crushed, bent, or used to support the brush. A gentle V or U cradle for the handle, plus a drip lip under the bristle end, covers most brushes. Size a couple of slot widths for your small cutting-in brush and your larger wall brush.
2. The can and tray rest: a safe parking spot mid-wall
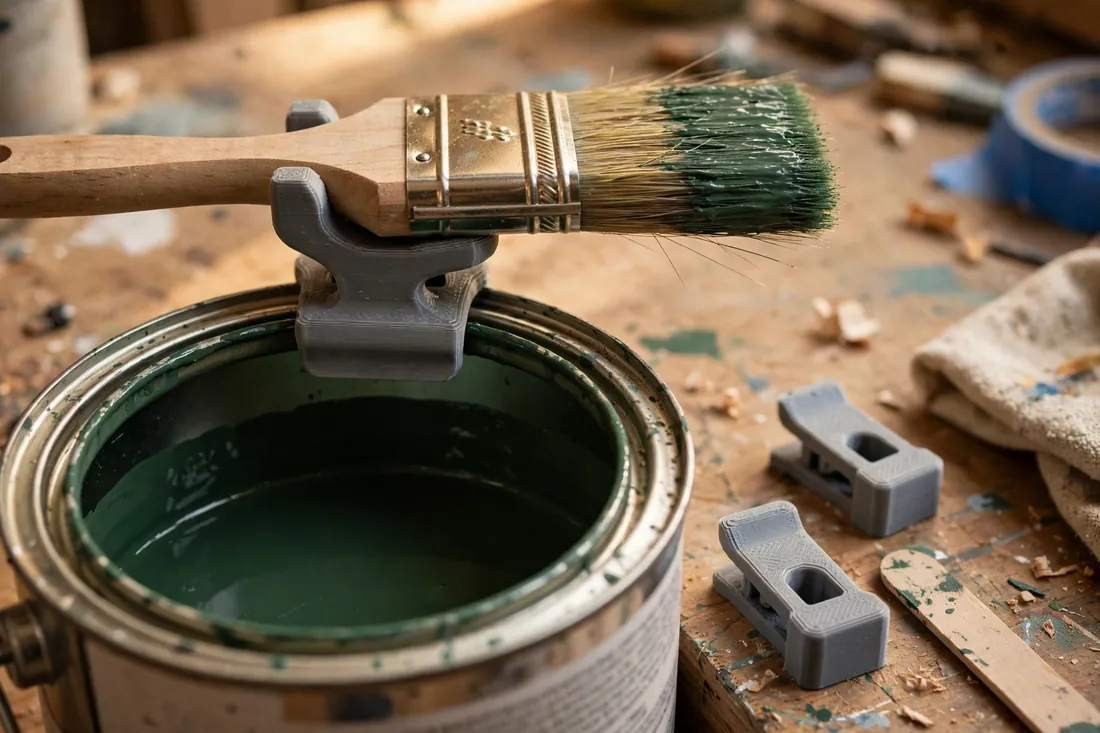
While you are actively painting, the handiest holder clips or hooks onto the rim of your can, tray, or pail and holds the brush horizontally, bristles over the paint, dripping back where drips belong. Design the clip to grip your actual rim thickness with a light spring fit, and keep the cradle long enough that the brush cannot roll off. This rest is a parking spot for minutes, not storage for hours.
3. The roller stand: hold the frame, spare the nap
A roller should pause standing on its frame, never resting on its sleeve. Model a stand that grips or cradles the frame handle and holds the sleeve clear of the tray, table, and dust sheet, slightly tilted so excess paint drains back toward the tray. For mini rollers, a simple upright cup for the handle works well. Make the base wide and a little heavy-looking — a stand that tips paints a stripe across your dust sheet.
4. The between-coats caddy: one home for the whole kit
A flat caddy or wall rack with a slot per brush, a hook for the roller frame, and a spot for a stir stick and opener turns cleanup and second coats into a grab-and-go job. Add drainage-friendly open slots rather than deep sealed cups, so a washed brush can air instead of sitting in water, and keep the whole caddy small enough to live on one shelf.
Step-by-Step: Printing and Assembly
- Measure your tools — handle widths, ferrule sizes, roller frame shape, and the rim thickness of your can, tray, or pail.
- Model the brush holder with a wide base, handle-sized cradles, and a drip lip.
- Model the rim rest to clip your actual container, and the roller stand to grip your actual frame handle.
- Print a test holder and rest, then fit them with dry tools and check stability with a gentle nudge.
- Clean up the prints. Ease any edge that touches a handle or rim, and clear slots by hand.
- Adjust clearances — about 0.5 mm of play for handles, a firmer spring fit for rim clips — and print the keeper set in PETG.
- Arrange the caddy or rack where the set will live, and confirm a wet brush can reach its holder in one step from the tray.
If a stand needs weights or tape to behave, widen its base and print it again.
Step-by-Step: Using the Holders During and Between Coats
- Set up before you open the paint. Place the brush holder and roller stand beside the tray, and clip the rest onto the can or pail.
- Park, never lay down. Every time the brush leaves your hand — to move a ladder, tape an edge, or answer the door — it goes in the holder or on the rest, bristles clear and drips contained.
- Stand the roller by its frame in its stand whenever you pause, with the sleeve clear of every surface.
- For a short pause between coats, keep tools loaded and parked in their holders, covered or wrapped as your paint label directs, out of sun and moving air so nothing skins over.
- For a longer break, wash tools properly instead. Holders are for pauses, not a substitute for cleaning — follow the paint label for washing and drying.
- Store washed, fully dry tools in the caddy, brushes by their handles with bristles unbent and uncovered enough to stay dry, roller sleeves standing clear.
- Before the next coat, check bristles and nap. A tool that paused in its holder should feel like the tool you set down — soft, clean, and ready.
That small parking habit, repeated all day, is the whole system. The prints just make the right habit the easy one.
Tips for Better Results
- Keep one holder at the tray and one at the ladder if you paint big rooms, so a brush never gets laid on a step.
- Print rests in a bright color. A paint-colored rest under a loaded brush is a mess waiting to happen.
- Wipe holders while paint is still wet. Dried paint on a rest transfers back onto clean handles and hands.
- Label slots by brush size with a paint pen, so the cutting-in brush goes home to the right cradle every time.
- Rest mini rollers too. Their small sleeves dry and flatten fastest of all when left lying in a tray.
Common Mistakes to Avoid
- Resting a brush on its bristles. It bends them permanently and grinds paint into the ferrule. Always support the handle.
- Leaving a roller sitting on its nap in or out of paint. One flat spot can stripe every pass afterward.
- Undersizing the stand base. Painting gear gets knocked. A wide, stable base is not optional decoration.
- Using holders as long-term wet storage. Overnight or longer, clean tools properly rather than trusting any holder, wrap, or tray.
- Letting dried paint build up on clips and cradles. Buildup changes the fit, and flakes end up in your next finish.
Care, Storage, and When to Choose an Alternative
Rinse or wipe holders according to the paint you used, let them dry fully, and store the set together in the caddy on a shelf, away from heat. PETG handles repeated washing well; retire any clip that has cracked or lost its spring rather than trusting it over a full can. Check cradle edges now and then and re-sand anything that has gone rough.
Bought alternatives earn their place too. A magnetic brush holder suits steel pails, and a full rolling paint cart suits someone decorating a whole house in one stretch. For a room or two at a time — most home painting — the printed set covers the real need: a safe pause for wet tools and a tidy home for dry ones, sized exactly to the brushes and rollers on your shelf.

FAQ
How long can I leave a brush in its holder between coats?
For the normal gap between coats on the same day, a loaded brush parked in a holder and protected as the paint label directs stays ready to use. If the break stretches overnight or longer, wash the brush properly instead — holders support short pauses and drying after washing, not long-term wet storage.
Will these holders fit any brush or roller?
They fit the tools you size them for. Handles and frames vary, so the guide has you measure your own set and print with a little clearance. Most home sets need only two brush slot sizes and one roller stand; an unusual handle shape gets its own cradle, which is quick to model and print.
Can I print holders in PLA, or do I need PETG?
PETG is the better keeper choice because it tolerates knocks, flexes instead of chipping, and cleans up well after repeated painting days. PLA is fine for testing fit and for a gentle indoor set. Either way, generous walls matter more than the filament name.
How do I stop dried paint ruining the holders?
Wipe or rinse them during cleanup, while residue is still fresh, and never park a clean, washed brush in a holder still dirty from the last coat. Smooth, simple shapes help — paint peels from them far more easily than from textured or detailed prints.
Conclusion
Great paintwork is rarely about a heroic final coat. It is about a brush that stayed clean, soft, and drip-free between coats, and a roller whose nap survived its pauses. A small set of printed holders, rests, and a caddy makes that the default instead of the exception, for the cost of an evening’s printing.
Print a holder and a roller stand before your next room, park your tools properly all day, and feel the difference on the second coat.
For the bench those tools return to afterward, see our related guide, “Sandpaper Organizer and Storage Box: 3D Print a Grit-Sorted System for Your Workshop,” another simple printed system that keeps a hardworking workshop in order.