Introduction
A band clamp is the kindest way to pull a frame together — and it still manages to bruise it. The strap rounds each corner with all its force concentrated on a few millimeters of wood. Miter tips, the sharpest and most fragile part of the whole frame, get crushed, rounded over, or pushed out of square while you are busy watching the other three corners.
Bare strap on bare wood has two faults at once. It concentrates pressure exactly where the wood is weakest, and it lets corners slide as tension rises, so the frame that measured square dry ends up a quiet parallelogram in glue.
3D printed band clamp corner blocks fix both faults in one small part. Each block cups a corner in a clean 90-degree cradle, spreads the strap’s pull across the full corner, and routes the strap through a smooth outer groove so tension travels evenly around the frame. The miters meet tip to tip, protected, and the block’s square faces give you something honest to measure against.
This guide covers designing blocks for common frame stock, printing a matched set of four (or eight), and running a glue-up that stays square. These are pressure-spreading accessories for a standard band clamp — the strap and its ratchet do the work, the blocks simply make that work gentle and even.
What You Need
Four small blocks, one strap clamp, and the frame you are gluing. The print is undemanding; the sizing is what deserves your attention.
Materials and tools
- A home 3D printer with a build area of roughly 100 mm in at least one direction
- PETG filament for strong, slightly forgiving blocks; PLA works for light frames
- A webbing band clamp with strap about 25 mm wide — measure yours
- The frame stock or a sample corner, for sizing the cradle
- Calipers or a ruler, plus a combination square for glue-up checks
- A tape measure for diagonal checks, and glue-up supplies as usual
PETG is the sensible default: strap tension is continuous for hours, and PETG resists that slow creep better than PLA while tolerating the odd drop onto concrete. For small, light frames and short glue-ups, PLA blocks are perfectly adequate.
Suggested print settings
- Layer height: 0.20 mm; blocks are chunky parts where strength beats surface detail.
- Walls: 4 to 5 perimeters — the cradle walls carry the strap’s inward pull.
- Infill: 50 percent or more, grid or gyroid. Corner blocks earn their keep under sustained load.
- Top and bottom layers: 4 or more on the cradle faces that touch the wood.
- Orientation: Print with the cradle opening up, so layer lines run around the block rather than across the strap groove.
- Supports: None if the strap groove is modeled with a rounded, self-supporting profile.
Print one block first and test it on a dry-assembled corner with your actual strap before printing the matched set.
Design Considerations
A corner block does three jobs — cradle, cushion, and guide for the strap — and each has a dimension that matters.
1. The cradle: square inside, sized to your stock
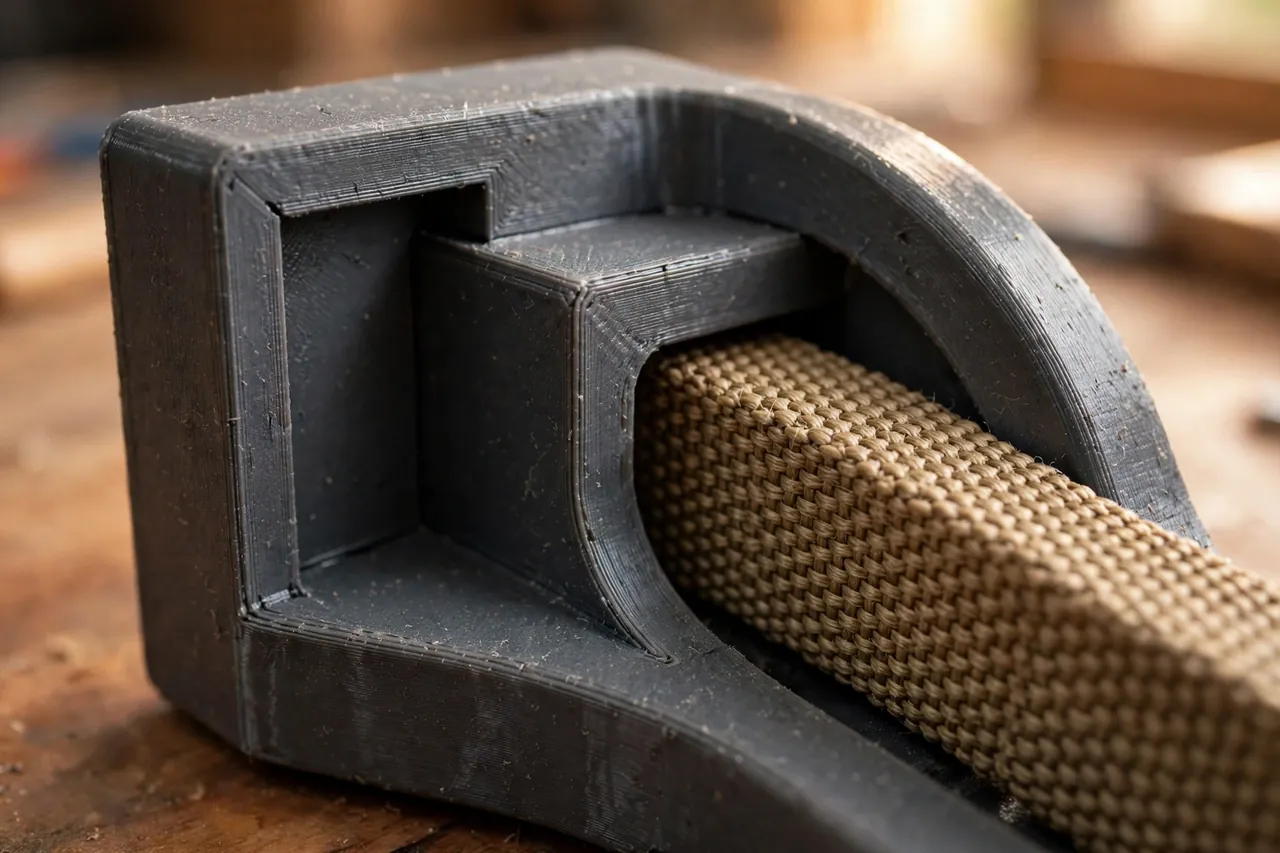
The inner faces must meet at a true 90 degrees, with a small relief notch exactly at the inner corner. That notch is not sloppiness: it clears the tiny bead of glue squeeze-out and the microscopic imperfection at a miter tip, letting both faces seat fully. Size the cradle’s contact length to your frame stock — about 25 to 40 mm along each face suits most picture frames and small boxes. Add roughly 0.3 to 0.5 mm of clearance so the block slips on without forcing the joint open.
2. The strap groove
Around the outside, model a smooth, rounded channel a few millimeters wider than your strap — typically 28 to 30 mm for a 25 mm strap — and about 3 to 4 mm deep. The groove keeps the strap centered and stops it wandering toward a miter tip as tension rises. Round every edge the strap touches; a sharp printed edge will saw at webbing under load, slowly and expensively.
3. Keeping pressure even
The block’s outer shape should present the groove’s center roughly in line with the corner’s diagonal, so the strap pulls the corner straight into its cradle rather than twisting it. Symmetric blocks that can be flipped either way up make setup faster and prevent the classic mistake of one block seated differently from the other three. Slightly padding the cradle faces — a modeled 0.5 mm recess for a strip of cork or a TPU inlay — is a kind extra for soft or pre-finished stock.
Step-by-Step: Printing and Assembly
- Measure your frame stock — its width and thickness at the corners — and your strap’s width.
- Model one block: square cradle with corner relief, rounded strap groove, symmetric top and bottom.
- Print a single test block and dry-fit it on an assembled corner; faces should seat fully with a whisper of clearance.
- Run the strap through its groove and apply light tension. The block should sit calmly, not tilt or ride up.
- Print the matched set — four for a frame, eight if you stack two frames or glue a box in two stages.
- Clean the grooves of any stringing or blobs; the strap must glide, not snag.
- Label the set with a paint pen if you print multiple sizes, and store the blocks clipped onto the strap itself.
Step-by-Step: Using Corner Blocks for a Frame Glue-Up
- Dry-assemble the frame with blocks and strap, no glue, and check both diagonals are equal.
- Rehearse the tightening order. Note which corner tends to drift; you will correct it first later.
- Open the frame up on the bench, apply glue to the miters, and reassemble with blocks at each corner.
- Thread the strap through all four grooves and take up slack until the blocks just seat.
- Snug the strap gradually, walking around the frame and tapping each block fully home as tension rises.
- Check the diagonals again at moderate tension. Equal diagonals mean square; nudge a corner along the bench to correct small errors.
- Sight every miter tip. Blocks protect tips, but a misaligned tip still needs a gentle tap into line now, not after the glue grabs.
- Apply final tension — firm, not heroic. The strap should sing slightly; the wood should not creak.
- Wipe squeeze-out at the relief notches, where the blocks conveniently gather it, and leave the frame undisturbed for the glue’s full clamp time.
Tips for Better Results
- Glue a thin cork or felt pad inside each cradle for pre-finished or gilded stock; the block does the geometry, the pad does the pampering.
- Print one spare block with every set. A lost block mid-glue-up is a small emergency; a spare in the drawer is a shrug.
- Mark the diagonal on the frame’s back before gluing, so measuring under strap tension is quick and unambiguous.
- Use two straps on tall boxes, one near the top and one near the bottom, each with its own set of blocks.
- Ease tension before removing blocks — release the ratchet gradually so a sprung corner does not snap a miter open.
You may also enjoy our related guide, “Replacement Spring Clamp Tips: 3D Print Soft Tips That Stop the Marks,” for the holding and positioning work around the main glue-up.
Common Mistakes to Avoid
- Skipping the corner relief notch. Without it, squeeze-out and miter tips hold the block’s faces off the wood, and pressure goes anywhere but even.
- Grooves too narrow for the strap. A pinched strap twists the block as tension rises. Give webbing room to lie flat.
- Cranking the strap to maximum. Corner blocks spread force, they do not repeal physics: overtightening still crushes softwood fibers.
- Mixing block sizes in one set. Even a millimeter’s difference in cradle position shifts how corners seat. Print sets together, use sets together.
- Checking square by eye. Diagonals with a tape take twenty seconds and tell the truth; eyes, under glue-up pressure, lie kindly.
Care, Storage, and When to Choose an Alternative
Brush dried glue from the cradles — it releases from PETG with a thumbnail — and store blocks threaded on their strap, hung from a hook. Inspect grooves occasionally for edge wear where the strap runs; a block with a frayed groove gets retired to light duty or reprinted, since a fresh set costs a few hours of unattended printing.
Choose differently when the work changes scale. Very large frames and cabinet cases may need corner blocks of hardwood or commercial cauls that span more stock, and production frame shops use pneumatic joiners for speed no hand strap can match. For boxes and frames at home scale, printed blocks and a strap clamp are the sweet spot — and our related guide, “Assembly Squares: 3D Print Large Clamping Squares for Square Cabinets and Boxes Every Time,” covers the panel glue-ups that follow framing. For right-angle holding while fasteners go in, “DIY Corner Clamp: 3D Print a Right-Angle Clamp for Frames, Drawers and Cabinet Repairs” is the natural companion.
FAQ
Will the blocks fit any band clamp?
Almost any webbing strap clamp, provided the groove matches your strap width. Measure the strap first and size the groove a few millimeters wider. Ratchet straps with hooks are a poorer match; the flat webbing style works best.
Can I use these blocks for box glue-ups as well as frames?
Yes — boxes are frames with depth. Use two straps with blocks at top and bottom corners for taller boxes, and check diagonals on both faces. The cradle relief also clears the extra squeeze-out boxes tend to produce.
Do the blocks leave marks of their own?
Not when the cradle is smooth and correctly sized. Sand any print ridge inside the cradle, and add cork or felt pads for soft or finished wood. The whole point of the block is a wider, gentler footprint than strap alone.
What if my frame stock is unusually wide or thick?
Scale the cradle’s contact length up so the block still spans the corner handsomely, and increase walls and infill a step — wider stock usually means a bigger frame and higher strap tension. The design scales gracefully; just keep the relief notch and groove proportions.
Conclusion
Crushed miter tips and quietly crooked frames are not the price of band clamping; they are the price of letting a strap bear directly on fragile corners. A set of 3D printed band clamp corner blocks interposes square geometry and a broad, kind footprint between strap and wood, and the difference shows in the very first glue-up.
Print a matched set for your most common frame stock, store them on the strap, and let your diagonals finally agree with each other.
It is a small print with an outsized effect.