Introduction
A good workbench does half the holding for you — if you use its dog holes. Those round holes are meant for bench dogs, small stops that give your workpiece something solid to push against, and for hold-down clamps that press work flat while you saw, plane, route, or sand.
Metal dogs work well, but they are easy to lose, pricey in sets, and rarely shaped for the small, awkward jobs that fill a home workshop: a narrow strip that needs sanding, a panel that spins under a sander, a board that must stay put without a clamp jaw bruising its face.
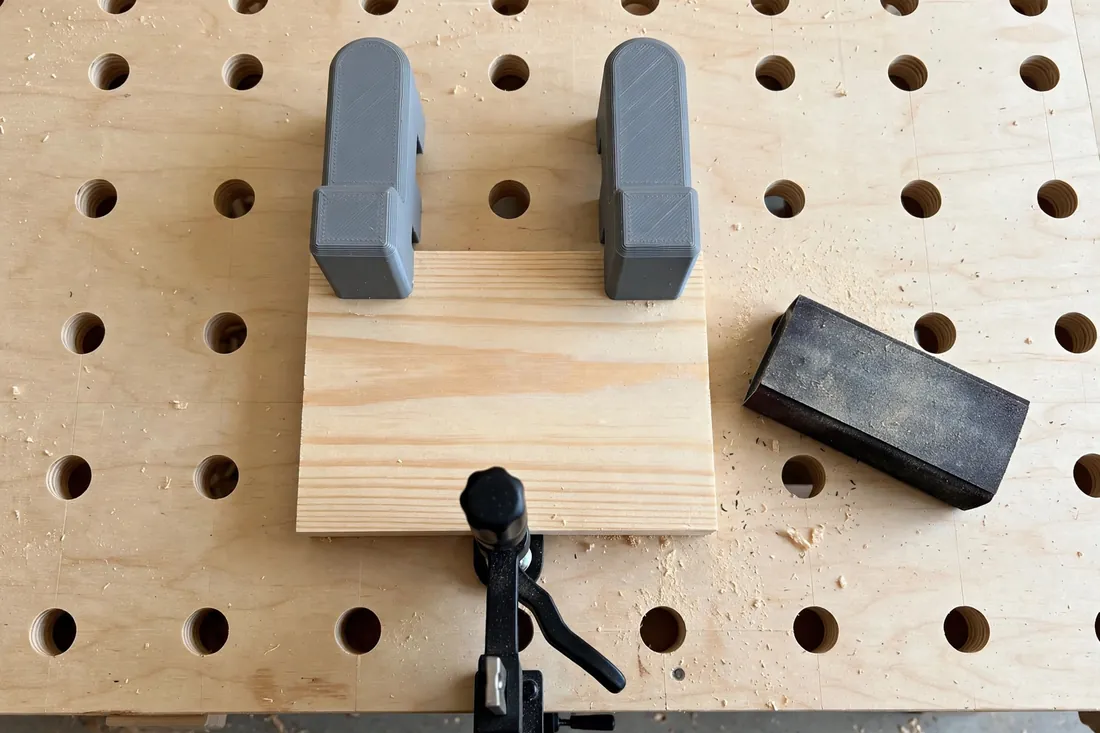
That is where 3D printed bench dogs shine. You can print dogs that drop into standard holes in minutes, low-profile hold-downs that stay clear of your tools, and custom sizes for the exact bench you own.
This guide covers an original, simple set: a snug-fit bench dog with an optional spring-plunger idea for a firmer seat, and a low-profile hold-down clamp that presses work down toward a dog. Used within their limits, they make everyday bench work calmer and faster.
What You Need
These are small, solid parts that print quickly on almost any home printer. Strength matters more than size, so choose settings with pushing and clamping forces in mind.
Materials and tools
- A home 3D printer with a build area of roughly 120 mm in one direction
- PETG filament for the keeper set, or PLA for a quick test set
- Calipers to measure your dog holes and bench top thickness
- Your workbench, with its dog holes cleared of dust
- A tail vise with a dog, if your bench has one, or a second printed dog
- A small file or sandpaper for easing stems
- Optional: a small steel ball and short stiff spring, or flexible filament, for the plunger version
- A test board you do not mind marking
Measure before you model. Benches vary more than catalogs suggest, and a dog 0.4 mm too wide is just a frustrating plug.
Suggested print settings
- Layer height: 0.20 mm is fine; these parts need no fine detail.
- Walls: At least 4 to 5 perimeters — stem and head both take side loads.
- Infill: 50 to 70 percent, grid or gyroid. Work-holding parts should feel dense.
- Top and bottom layers: 5 or more, so the dog head stays flat and hard-wearing.
- Orientation: Print upright, on whichever flat face gives the truest stem.
- Supports: None for a good design; add a brim if tall dogs wobble.
Print one dog first and test it in several holes. Holes wear unevenly, and a fit that is perfect at the front may be loose at the back.

Design Considerations
The design is deliberately plain: a round stem, a low head above the bench, and, for the hold-down, a short arm with a pad. Plain prints reliably, cleans up fast, and resizes easily.
1. Stem size for 20 mm and 3/4-inch holes
The two common standards are 20 mm holes, found on many modern benches, and 3/4-inch holes, about 19.05 mm, common on traditional benches. They are close, but not interchangeable: a 20 mm stem will not enter a 3/4-inch hole, and a 3/4-inch stem rattles in a 20 mm hole.
Model two separate files and print them in different colors if you own both bench types. Aim for a stem 0.2 to 0.3 mm under your measured hole size, 30 to 45 mm long — long enough to resist tipping, short enough to clear drawers under a thinner top. Add a tiny chamfer at the tip so the dog finds the hole without catching.
2. A snug fit, a spring, or a simple plunger
A plain snug-fit stem is the simplest and, for most jobs, best answer. If your holes are worn or oversized, add grip instead of printing an oversized stem that might jam.
One original approach is a small side plunger: a shallow pocket in the stem holding a steel ball backed by a short spring, or a printed flexible tab, pressing lightly against the hole wall. It should click in with gentle resistance, not need a mallet. Keep the pocket inside the stem profile and test that the ball cannot fall out. Simpler still, a single vertical split at the stem’s base lets it flex a fraction for a similar snug feel.
3. Dog head shape and height
The head is what your work pushes against. A rectangular head about 25 to 35 mm wide, 12 to 18 mm tall above the bench, and 10 to 15 mm thick handles most boards. Keep it low: a tall head flexes more and can foul a plane or saw handle.
Round the top corners, keep the working face flat and square to the stem, and consider a shallow V or two small steps on one face for round or narrow stock. One flat face, one stepped face — just rotate the dog in its hole to choose.
4. The low-profile hold-down clamp
The companion piece is a simple hold-down: a stem in a hole near the work, a low arm reaching over the board’s edge, and a pad pressing down near that edge. Add a thumb screw or a simple wedge slot so you can set and release pressure by hand.
Keep the arm low and short. A long, high arm flexes, lifts, and blocks your tools. A pad about 20 mm square, with a textured or cork-faced underside, spreads pressure and reduces slipping. Make two or three arm lengths, so the clamp sits in the nearest hole instead of stretching across the bench.
Step-by-Step: Printing and Assembly
- Measure your holes in several places with calipers; note the smallest reading.
- Measure bench thickness and check what sits under the top, so stem length clears it.
- Model the dog — stem, chamfered tip, low head — plus the hold-down arm and pad.
- Print one test dog in PLA and try it in every hole you use.
- Check the fit. It should drop in freely, sit without rocking, and pull out one-handed.
- Adjust once. Loose? Add 0.15 mm to the stem. Tight? Remove 0.15 mm.
- Print the keeper set in PETG: four dogs and two hold-downs make a useful set.
- Clean and assemble. Ease sharp edges; fit the spring and ball if using the plunger version.
- Mark the size on each head with a paint pen, so the sets never mix.
Step-by-Step: Using Bench Dogs and Hold-Down Clamps
- Clear the holes. Brush out dust; packed dust makes a good fit feel loose.
- Place the first dog just beyond the end or edge of your workpiece.
- Set the work against it, flat face of the head flush along the board’s edge.
- Add the second point of hold. Drop a second dog at the other end, or close your tail vise so its dog pushes the work against the first printed dog.
- Check for square. Confirm the board has not twisted as pressure was applied.
- Add a hold-down in a nearby hole, pad near the corner, and tighten until the board cannot lift or chatter.
- Test the hold with a firm hand push in the direction you will work, before any tool touches the wood.
- Work, then re-check. After the first few strokes, confirm nothing has crept.
- Release in reverse. Loosen the hold-down first, then open the vise or lift the dogs.
For sanding and light routing, two dogs and one hold-down are usually plenty.
Tips for Better Results
- Work in pairs. A single dog is a pivot; two dogs, or a dog and a vise, are a hold.
- Keep faces clean. Wax and dust on a dog’s face make work slip when you lean on it.
- Use the low head. Resist taller dogs for reach — clamp an offcut against a low dog instead.
- Color-code by size. Different colors for 20 mm and 3/4-inch sets prevent a jammed stem.
- Keep spares in the bench. Dogs stored in spare holes are always where your hand expects them.
Common Mistakes to Avoid
- Printing one size for both standards. The near-match guarantees either a jam or a rattle.
- Using too little infill. A hollow-feeling dog flexes and lets work creep mid-cut.
- Over-tightening the hold-down. Firm is enough; crushing force can crack the arm or dent the work.
- Trusting a single dog for a long board. Long stock levers a lone dog sideways — add a second point.
- Leaving dogs in a cutting path. Plan the layout first; keep printed parts clear of blades and bits.
Care, Storage, and When to Choose an Alternative
Brush dust off after use, check stems for cracks, and reprint any dog that starts to rock — a replacement costs cents and minutes. Store the set flat in a shallow drawer or standing in spare holes, away from prolonged heat that softens PLA. PETG shrugs off a warm workshop far better.
Be honest about limits. For heavy planing of wide, stubborn boards, aggressive chopping, or any job where you throw your full weight against the stop, metal bench dogs are right: they flex less and wear slower. Printed dogs earn their keep on the lighter majority — sanding, sawing small stock, careful routing, assembly, and layout — where speed and low profile matter more than brute strength.
FAQ
Will a 3/4-inch dog work in a 20 mm hole if I sand it down?
Not well. Sanding a stem down is possible, but sanding a small stem up to fill a bigger hole is not, and a hand-sanded stem is rarely round or straight. Print each size properly — two short prints beat one wobbly compromise.
How strong are printed bench dogs, really?
For hand sanding, light planing of easy stock, sawing small pieces, and layout work, a solid PETG dog with generous walls is plenty strong. The honest limit is heavy, repeated side load: vigorous planing or chopping can crack a stem. That is metal-dog work, and switching is the smart move, not a failure.
Do I need a tail vise to use bench dogs?
No. A tail vise makes the classic setup easy, but two dogs with a hold-down, or a dog paired with a clamped stop, work well for lighter jobs. The principle is the same: one stop to push against, and a second point so the work cannot rotate.
Why does my hold-down lift the board instead of pressing it flat?
Usually the arm reaches too far, or the pad sits too close to the board’s edge, so tightening levers the board up. Move to a closer hole, center the pad further onto the board, and tighten gradually while pressing the board down until the pad takes over.
Conclusion
Bench dogs are the smallest upgrade with the biggest effect on bench work. A few printed dogs and a pair of low hold-downs turn holes you already have into a fast, flexible holding system for the small jobs that make up most home repairs.
Print a test dog, dial in the fit for your bench, and build a small color-coded set. You will reach for them constantly.
For the boards and panels those dogs hold so well, you may also enjoy our related guide, “3D Printed F-Clamp Pads and Soft Jaws: Protect Workpieces While You Clamp,” which pairs naturally with this setup whenever a job calls for a clamp as well as a stop.