Introduction
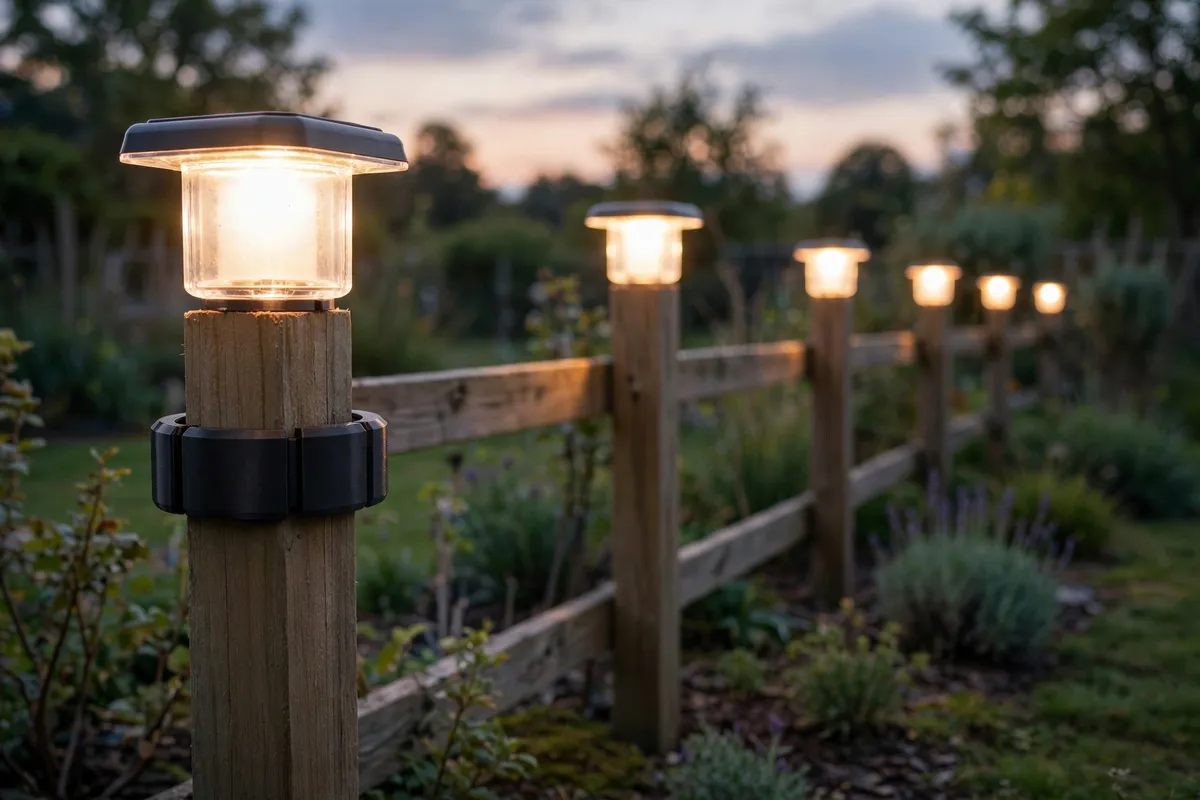
Solar post cap lights should be the easiest upgrade in the garden: no cables, no digging, just a cap that sits on the fence post and glows at dusk. Then reality arrives. Your posts are a slightly odd size, the caps are made for a nominal size that matches nothing you own, and half the lights rock, tilt, or blow off in the first honest wind.
A 3D printed adapter solves the mismatch properly. It is a simple passive fitting — a ring, collar, or shallow tray — that bridges the gap between your post’s real dimensions and the cap light’s base, so the light seats snugly, sits level, and stays put. You measure once, print a fitting per post size, and the whole fence line matches.
One point deserves stating plainly at the start: the adapter is only a mechanical fitting, like a shim or a collar. A solar post cap light is a sealed, self-contained, store-bought unit with its panel, battery, and LED already inside. The printed adapter never opens the light, never touches its wiring or battery, and plays no electrical role at all — it simply gives the finished light a post it fits. If a light itself fails, that is a warranty or replacement matter, not something to repair by opening the unit.
This guide covers measuring posts and lights, designing adapters that grip kindly and drain freely, and printing them in materials that survive on top of a fence.
What You Need
Fence-top fittings live outdoors in full weather, so material choice matters more than almost anything else here. Plan for sun-tough filament and precise measurements.
Materials and tools
- A home 3D printer with a build area of roughly 180 mm or more in one direction — enough for most post sizes
- ASA filament for the best outdoor life, or PETG as a very good second choice
- Your solar post cap lights, with their bases and any included fitting inserts removed and set aside
- Calipers or an accurate tape measure for post and cap-base dimensions
- A pencil and a small level for checking the fit on the post
- Optional short stainless screws or a bead of outdoor-rated flexible adhesive if your design uses mechanical fixing
- A post offcut or the real fence post for test-fitting before the full run
Skip PLA entirely for this job: a black cap on a sunny fence cooks its fitting, and PLA softens and creeps in exactly those conditions.
Suggested print settings
- Layer height: 0.24 to 0.28 mm keeps these chunky rings quick while staying strong and watertight enough for a fitting.
- Walls: 4 to 5 perimeters. The ring’s strength and grip live in its walls.
- Infill: 30 to 40 percent, gyroid or grid. The fitting is squeezed and weather-beaten, not load-bearing.
- Top and bottom layers: 5 or more on any face that meets the post top, for a flat, even seat.
- Orientation: Print the ring flat on the bed, opening upward, so its roundness comes from the model’s geometry.
- Supports: Stepped rings usually need none; add them only for deep internal overhangs.
Design Considerations
You can model these adapters in any basic CAD program, including free browser-based tools. Every design is a conversation between two measurements: the post you have and the base the light expects.
1. Measure the real post — nominal sizes lie
A “100 mm post” is rarely 100 mm. Timber posts vary by millimetres between faces, shrink as they dry, and are often capped with end grain that is not perfectly square. Measure across both axes at the very top of each post, and measure the inside of the light’s base the same way. The adapter’s job is to swallow the difference.
For a fence run, measure every post, not just the first. Group them: posts within a millimetre or two share an adapter; the odd ones get their own size. Printing three sizes of ring for a twelve-post fence is normal and cheap.
2. The three adapter shapes that cover almost everything
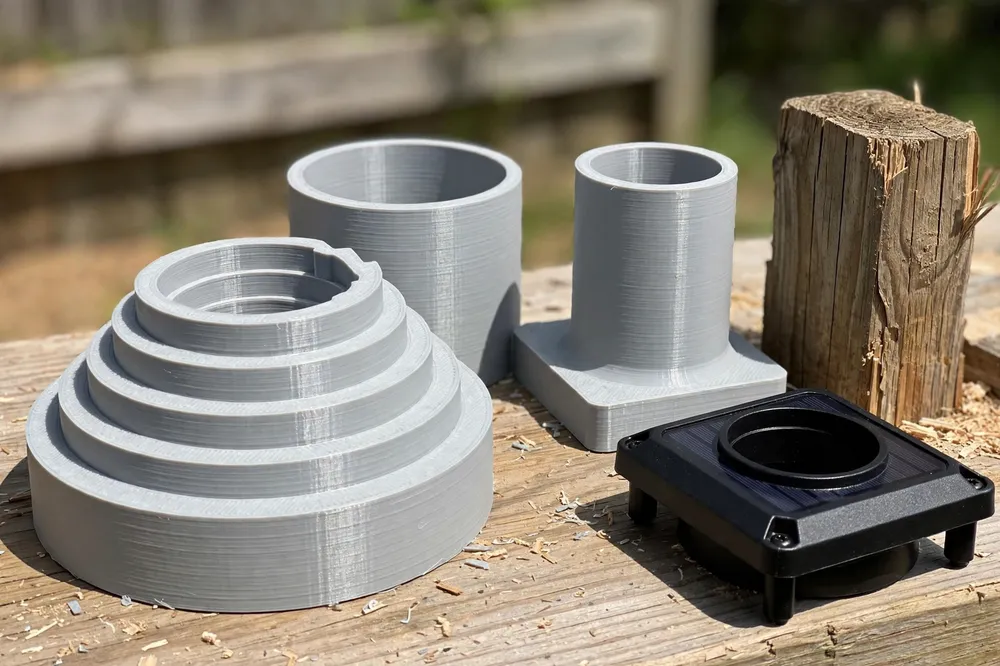
Most mismatches yield to one of three forms. A reducer collar fits over a post that is slightly smaller than the light base expects, building the post’s effective size up with a ring that has the post’s size inside and the base’s size outside. A riser ring lifts the light a few millimetres when a post cap, bolt head, or uneven top prevents the base from seating. And a transition tray — a shallow square plate with a locating lip — handles square-post-to-round-base changes and badly out-of-square post tops, giving the light a flat, level landing.
All three share the same virtues: a firm push fit, a small drainage path so water never ponds inside, and no part that traps the light if its battery door sits underneath.
3. Grip without violence
The fit should be a confident push: firm enough that wind and knocks cannot walk the light off, gentle enough that you can lift the light away for cleaning or winter storage. Aim for about 0.3 to 0.5 mm of total clearance on a push fit, and add two or three shallow vertical ribs inside the ring if your posts vary — the ribs flex and forgive, keeping pressure even.
Avoid designs that wedge hard onto end grain or rely on screws driven into the post top’s centre, where timber splits easiest. If you add fixing holes, put them in a flange that screws to the post’s sides, not its top.
4. Water and sun management
A fitting on a post top lives in a puddle’s favourite place. Slope the adapter’s top surfaces slightly outward, open a small notch at the lowest side so driven rain can escape, and never create a sealed cup under the light that holds water against its base. ASA shrugs off ultraviolet for years; PETG does nearly as well. Black and dark colours hide algae staining and match most lights; white reflects heat if your summers are fierce.
Step-by-Step: Printing and Assembly
- Measure every post top in both directions, and the inside of one light base. Note the sizes and group your posts.
- Choose the adapter shape for each group: reducer collar, riser ring, or transition tray.
- Model the first adapter with your push-fit clearance and drainage notch, plus ribs if posts vary within the group.
- Print one test fitting and try it on the actual post with the actual light. Push, wiggle, and lift. Adjust clearance in the model in 0.2 mm steps until the fit is confident.
- Print the full run in ASA or PETG with the settings above, letting each part cool fully before test-fitting — warm plastic measures lying.
- Test-fit every adapter on its intended post. Fence posts are individuals; shuffle fittings between posts to find each one’s happiest pairing before final seating.
- Seat the lights, checking each sits level. A tray-style adapter can be leveled with a thin printed shim under one side if a post top is truly crooked.
There is no wiring, no opening of lights, and no other assembly. Measure, print, push on, done.
Step-by-Step: Fitting the Fence Line
- Clean the post tops. Brush off dirt, old fixings, and loose fibres so the adapter seats on sound timber.
- Dry-fit each adapter and mark its orientation with a pencil tick if it has a drainage notch — the notch faces downhill or away from the prevailing rain.
- Push the adapter home with firm, even hand pressure, rocking it as little as possible. It should sit square without gaps at one corner.
- Add fixings only if your design calls for them — side-flange screws or a bead of flexible outdoor adhesive under a tray — and only where the post is sound.
- Seat each light on its adapter with the same confident push, then check the whole line from a distance: caps level, gaps even, nothing rocking.
- Wiggle-test every light with a gentle push from two sides. Anything that shifts gets a rib added, a size change, or a small adhesive dot — fix it now, not after the storm.
- Step back at dusk and enjoy the part where they all come on at once.
Tips for Better Results
- Print a sizing gauge first. A short section of ring at two or three clearances tells you your printer’s real-world fit in ten minutes.
- Round every outer edge. Sharp corners on fence-top fittings catch sleeves, gloves, and the ladder; a 2 mm fillet ends it.
- Leave the battery door reachable. Check how your light opens for battery changes and make sure the adapter never blocks that door or the light’s lift-off path.
- Number the sizes. A tiny embossed dot code on the inside of each ring — one dot, two dots — keeps sizes sorted when you print spares.
- Print two spares of the commonest size. Fence lines lose fittings to storms and gardeners; spares in the shed make it a non-event.
Common Mistakes to Avoid
- Trusting the post’s nominal size. “100 mm” posts measure anywhere from 95 to 103 mm; unmeasured adapters are just printed disappointments.
- Printing in PLA for a sunny fence. Heat and ultraviolet reduce it to a warped, brittle ring within a season or two.
- Making a sealed cup. Trapped water under the light stains timber, corrodes the light’s contacts from outside, and freezes in winter.
- Blocking the light sensor or panel. Some caps sense darkness on the base edge; keep adapter walls below the light’s own base line so nothing shadows it.
- Wedging adapters on with force. A fitting that needs a mallet will split along layer lines now or in the first frost. Adjust clearance instead.
Care, Storage, and When to Choose an Alternative
Care is light: once a season, lift each light, rinse grit out of the adapter, check the fit is still confident, and wipe the light’s panel clean with a soft cloth so it charges well. Adapters that have gone slack after years of weather can be replaced from the saved model in an evening.
Store spare adapters with the garden bits, and keep one spare light’s worth of fittings with any spare lights you hold. If you already light the fence line itself, our guide “Solar Light Wall Mounts: 3D Print Brackets for Patios, Fences and Pathways” covers the wall-and-post-side companions to these cap lights, and “3D Printed Brackets for Solar Garden Lights: Repair Broken Stakes and Mounts the DIY Way” handles the ground-level lights in the same garden.
Sometimes a different route is better. Brand-new posts can simply be bought in the size your lights expect — the tidiest fix of all when you are building the fence anyway. Metal cap adapters exist for common sizes and suit very exposed, stormy sites. And if a light’s base is cracked or its battery is failing, replace the light; the adapter’s job is fit, not resurrection.

FAQ
Which filament lasts longest on top of a fence post?
ASA is the first choice: it was made for outdoor use, shrugs off ultraviolet, and keeps its fit through hot summers. PETG is a close second and easier to print. Avoid PLA outdoors here — sun and heat soften and embrittle it quickly in an exposed fence-top spot.
My posts are all slightly different sizes. Do I need an adapter per post?
Not quite — group them. Measure every post, sort the sizes, and print one adapter size per group of posts within about a millimetre. Ribs inside the ring forgive small differences. Only genuine outliers need a truly custom size, and on most fences that is one or two posts.
Can the adapter stop the light from charging properly?
Only if it shades the light’s panel or dusk sensor, which a base-level fitting should never reach. Keep the adapter at or below the light’s own base, never let a tray lip climb the sides, and the light charges exactly as designed. If a light still underperforms, clean its panel and check its age — the fitting is rarely the culprit.
Should I glue or screw the adapters down?
Usually neither: a correct push fit, proven by the wiggle test, is enough and keeps lights removable for cleaning and battery changes. On very exposed sites, a small dot of flexible outdoor adhesive under the adapter — not on the light — adds security while still allowing future removal with a firm twist.
Conclusion
A fence line of level, glowing caps is a measurement problem wearing a pretty disguise. Measure the posts you actually have, print the simple fitting that bridges each one to its light, and the caps sit square, stay put, and come on together at dusk.
It is a passive ring of plastic doing honest work: no wiring, no opened lights, just a perfect fit where the factory guessed wrong.