Introduction
Every socket set has a villain: the one size that is never in the case. It is under the bench, in a coat pocket, or inside the last job you did. Blown-plastic cases crack at the hinges, their clips loosen until half the set rattles loose, and the case only ever fits the sockets it came with — not the extra deep sockets and universal joints you bought later.
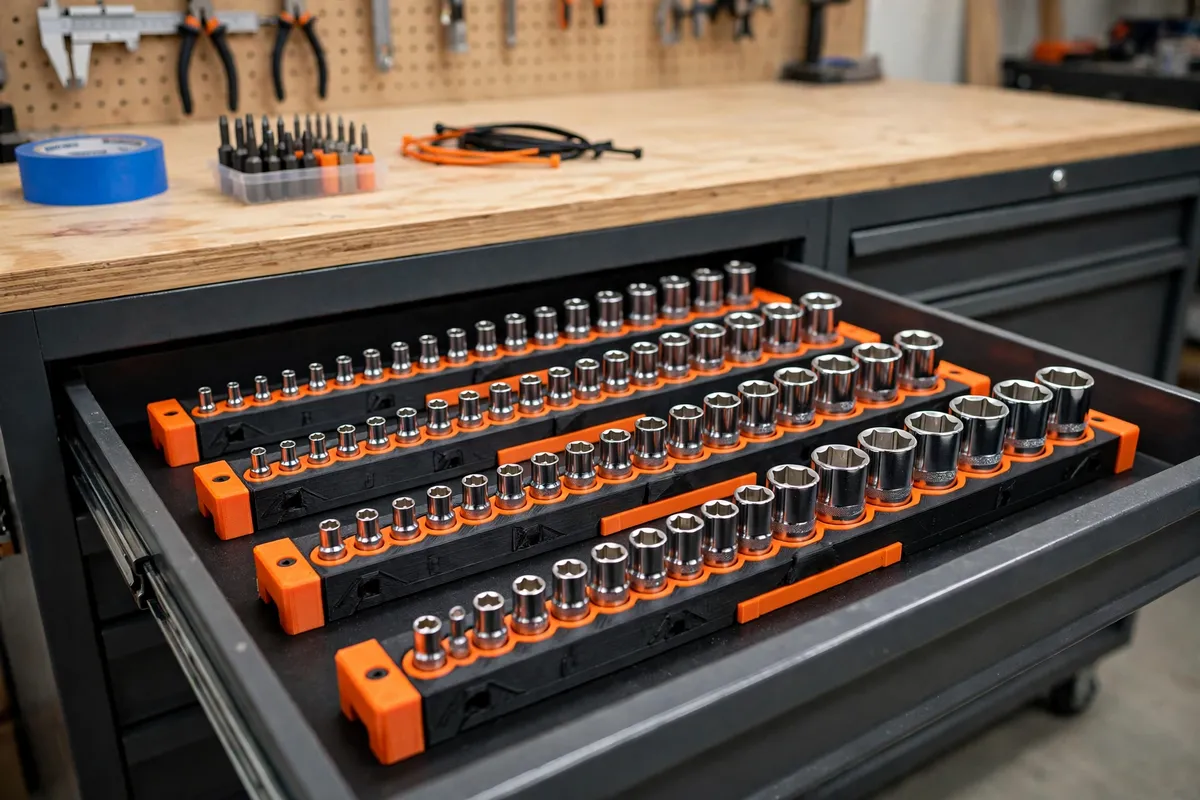
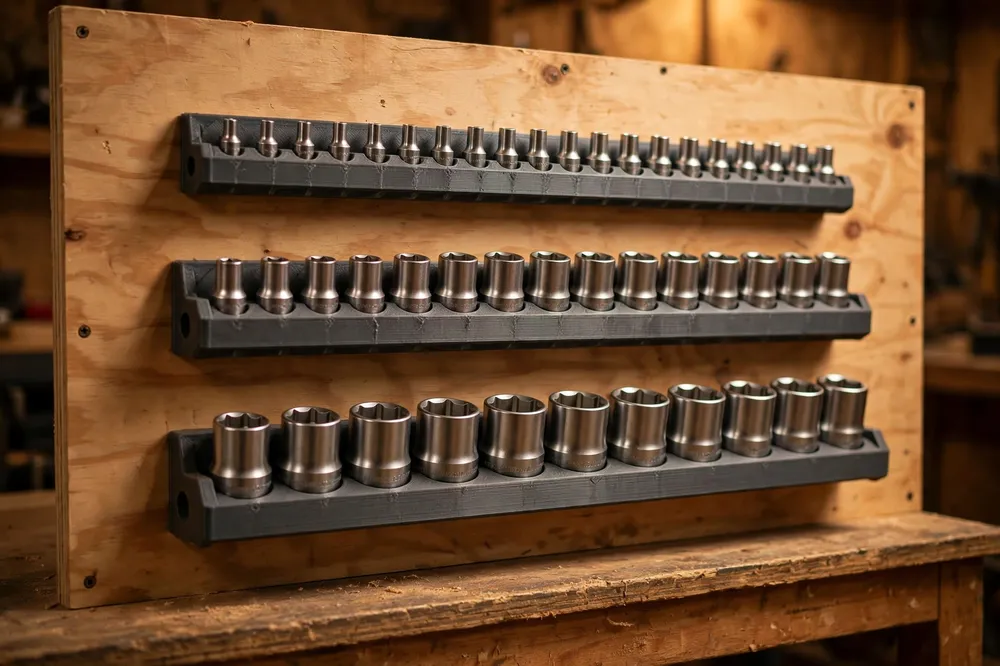
3D printed socket organizer rails fix the whole problem at once. Print rails with a clip or pocket for every socket you own, sized to each socket’s drive and outside diameter. Lay them in a drawer for a flat, visible, grab-and-go system, or screw them to a wall panel and take the set vertical. A missing socket announces itself as an empty labeled station, which is half of staying organized: knowing at a glance what is not home.
This guide covers designing rails that actually hold sockets securely, printing trays for drawers and rails for walls, and sizing a system that grows with your set instead of expiring with the next purchase.
What You Need
Sockets are heavy for their size, so clip design and material choice matter. Plan for tough filament and honest measurements of your actual sockets.
Materials and tools
- A home 3D printer with a build area of roughly 200 mm or more in one direction
- PETG filament for clips that flex without snapping (PLA is fine for fixed pocket trays)
- Your complete socket collection, gathered from everywhere it hides — this is the moment to find the missing ones
- Calipers, or a ruler and patience, for measuring socket outside diameters and drive squares
- A ratchet or two for judging handle clearance in drawers
- For wall mounting: screws suited to your wall or panel, a drill, and a level
- For drawers: drawer liner material or thin foam if you want the trays to stay put silently
- A fine marker or paint pen if you plan to highlight the size markings after printing
Measure sockets, not packaging. Two sockets marked the same size can differ in outside diameter between brands, and the rail must fit the steel, not the label.
Suggested print settings
- Layer height: 0.2 mm. Clips print cleanly and stations stay dimensionally honest.
- Walls: 4 perimeters, especially around clip bases where flex concentrates.
- Infill: 30 to 40 percent, gyroid or grid. Trays are mostly structure; clips need solid roots.
- Top and bottom layers: 4 or more for a smooth drawer-facing surface.
- Orientation: Print rails flat on the bed with clips pointing up, so flexing happens across layer lines as little as possible.
- Supports: None if clip geometry leans back at a friendly angle; design for the printer you have.

Design Considerations
You can model the rails in any basic CAD program, including free browser-based tools. A socket rail sounds trivial until a clip snaps or a socket will not let go — these four details decide which way it goes.
1. How the socket is held: clip, post, or pocket
Three holding styles cover nearly every need. A spring clip grips the socket’s drive end: two flexible jaws snap over the square drive’s ball detent recess, giving a positive click and one-handed removal — but the jaws flex on every use and must be designed generously. A round post the socket slides onto is simplest and nearly indestructible, but offers no retention if a drawer slams. A shaped pocket — a shallow well fitted to the socket’s outside — suits deep drawers and trays, holding by gravity and fit.
Match the style to the place: clips for wall rails where gravity works against you, pockets or posts in drawers where it works for you.
2. Sizing from real sockets
Model each station from measurements: the socket’s outside diameter at its widest band, the drive square size (1/4, 3/8, or 1/2 inch are the common drives), and the socket’s height if you are making lidded trays or checking drawer depth. Add about 0.3 to 0.5 mm of clearance around diameters so chromed, slightly oversized sockets still seat.
Graduated sets are not evenly graduated — diameters jump in steps that grow with size. Measure every socket in the row rather than interpolating; the ten minutes with calipers is the difference between a system and a rough draft.
3. Size markings you can read at a glance
The organizer’s second job is identification. Model raised or recessed size numbers beside each station, at least 8 to 10 mm tall so they read under drawer lighting. Raised numbers catch a wipe of contrasting paint beautifully: print in a dark colour, run a paint pen or a light sanding pass across the tops, and every size stands out.
If your CAD makes text painful, leave a flat label pad beside each station and use written labels — the system matters more than the method. Either way, a rail without sizes is a puzzle you rebuild every time you reach for the 13 mm.
4. Drawer trays versus wall rails
Drawers want low, wide trays: stations in rows, the tray sized to the drawer with a finger gap at the front, and handles, extensions, and ratchets given their own neighbouring space. Keep deepest sockets’ height plus tray base under the drawer’s clear depth, with the ratchet laid alongside to prove it.
Walls want rails with screw tabs or a French-cleat-style back, stations vertical-facing, and clips strong enough that a brushed sleeve does not rain sockets. Group wall rails by drive size, one rail per drive, so the whole 3/8 set lifts down as a unit when a job moves to the bench.
Step-by-Step: Printing and Assembly
- Gather and sort the whole collection by drive, then by size. Photograph the sorted rows — it is your build list and your before picture in one.
- Measure every socket: outside diameter, height, drive. Note any oddballs — deep wells, universals, spark-plug sockets — that need custom stations.
- Model one rail for the smallest drive first, with your holding style, clearances, and size markings, sized for its sockets in order.
- Print a three-station test piece covering the smallest, a middle, and the largest socket on that rail. Fit-check all three before printing full lengths.
- Print the full rails and trays in PETG for clipped parts, PLA acceptable for pocket trays, with the settings above.
- Clean and test every station, seating and removing each socket a few times. A clip that is too tight gets a careful pass with a file, not a forced socket.
- Highlight the size markings with a contrasting paint wipe if you modeled raised numbers, and let them dry fully.
- Load the rails in order and check the drawer closes or the wall layout fits, with ratchets and extensions given their places too.
Step-by-Step: Setting Up the Drawer and Wall Layout
- Drawer first: lay the trays in the empty drawer and shuffle until ratchets, extensions, and universals all fit with the rails. Group by drive in the order you reach for them.
- Line the drawer if the trays slide; a thin liner keeps everything silent and stationary.
- Label the tray ends by drive size, so an open drawer reads like an index.
- Move overflow and vehicle sets to the wall: mark rail positions with a level, spacing rails so the tallest sockets clear the one above.
- Fix wall rails into something solid — studs, a plywood tool panel, or proper wall anchors — because a full socket set is heavier than it looks.
- Load wall rails from the bottom row up, checking each clip’s grip with a gentle tug.
- Do the empty-station check: any gap in the rows is a socket still at large. Go and find it while you still remember where “at large” might be.
Tips for Better Results
- Print clips with the flex direction across the part’s width, and give clip roots a small fillet — sharp internal corners are where clips go to die.
- Leave one or two spare stations per rail. Sets grow; a rail with no room for the next purchase is a system with an expiry date.
- Colour-code by drive. A different filament colour per drive size makes the right row leap out mid-job.
- Keep a duplicates rail in the vehicle or toolbox for the sizes you use away from the bench.
- Weigh before you wall-mount. Fill the rails, then lift them; if it feels like a dumbbell, it needs studs, not drywall anchors.
Common Mistakes to Avoid
- Modeling from the size chart instead of the sockets. Real diameters vary by brand; assumed dimensions produce clips that crack or sockets that rattle.
- Stations too close together. Fingers need room to grip a socket between its neighbours, especially the small sizes in the middle of a row.
- Forgetting drawer depth. Deep sockets on a tray can exceed the drawer’s clear height; measure the deepest combination before printing the set.
- Clips printed in brittle settings. Too few walls or a glassy, under-extruded clip snaps on the third socket removal.
- No size markings. An unmarked rail forces you to test-fit sockets one by one — the exact chore the organizer exists to kill.
Care, Storage, and When to Choose an Alternative
Care is minimal: brush swarf and dust out of the stations, wipe oily sockets before seating them so the rails stay readable, and replace the occasional fatigued clip rail after heavy years — the model is saved, so a replacement is a print, not a project.
The rails pair naturally with our guide “3D Printed Drill Bit and Driver Bit Organizer: A Workbench Storage System That Grows With You” — sockets and bits organized in the same drawer language make the whole drawer read at a glance — and with the hanging stations in “Pegboard Tool Holders: 3D Print a Complete Organizer Set for Screwdrivers, Pliers and Wrenches” if your wall system grows beyond sockets.
Sometimes bought rails win. Spring-steel drawer rails are slimmer than any printed clip and suit very shallow drawers. Magnetic rails hold sockets fiercely and suit steel tool carts. If you carry your set to jobs daily, a quality blow-mould case with a working latch beats loose rails in a bag. For the home bench, though, printed rails fitted to your exact sockets are the system that finally sticks.
FAQ
Should I use clips or pockets for socket storage?
Clips for anything vertical or carried, pockets and posts for flat drawers. Clips retain sockets against gravity and bumps, which walls and mobile carts demand. In a drawer, gravity is your clip, and simple pockets are faster to print, gentler on the sockets’ finish, and impossible to snap.
How do I organize mixed brands with different diameters?
Measure each socket individually and model stations in size order with per-socket diameters. The rail follows the sockets you own, not a brand’s chart. Leave a little extra clearance on the stations for your roughest, oldest sockets; new chrome is usually truer than twenty-year-old steel.
What sizes should a home set cover?
Most home and vehicle work lives in 8 to 19 mm metric (or 3/8 to 3/4 inch SAE), across 1/4 and 3/8 drives for smaller fasteners and 1/2 drive for the stubborn ones. Organize what you own rather than buying to fill a rail — but model spare stations so the set can grow into the rail.
Can printed rails handle a full professional-size set?
Yes, with honest mounting. The rails themselves carry the weight easily in PETG with solid walls; the limit is the fixing. Long rails of large-drive sockets belong on studs or a proper tool panel, loaded progressively and tug-tested, not on a couple of small drywall anchors.
Conclusion
A socket set stops leaking into the workshop the moment every socket owns a labeled home. Printed rails give each one exactly that — sized to your steel, arranged your way, in drawers and on walls, with empty stations that tell you what is missing before the job does.
Measure the real sockets, print a test trio, and build the system your set has always deserved.