Introduction
Router bits are precision cutting tools with two enemies: each other, and the drawer. Carbide edges are hard but brittle — one bit rolling against another in a toolbox chips both — and a bit tossed loose into a drawer comes back with its edge dulled, its shank rust-flecked, and its owner unable to remember which profile it even is. The foam trays bits arrive in tear, collapse, and fit no one else’s collection.
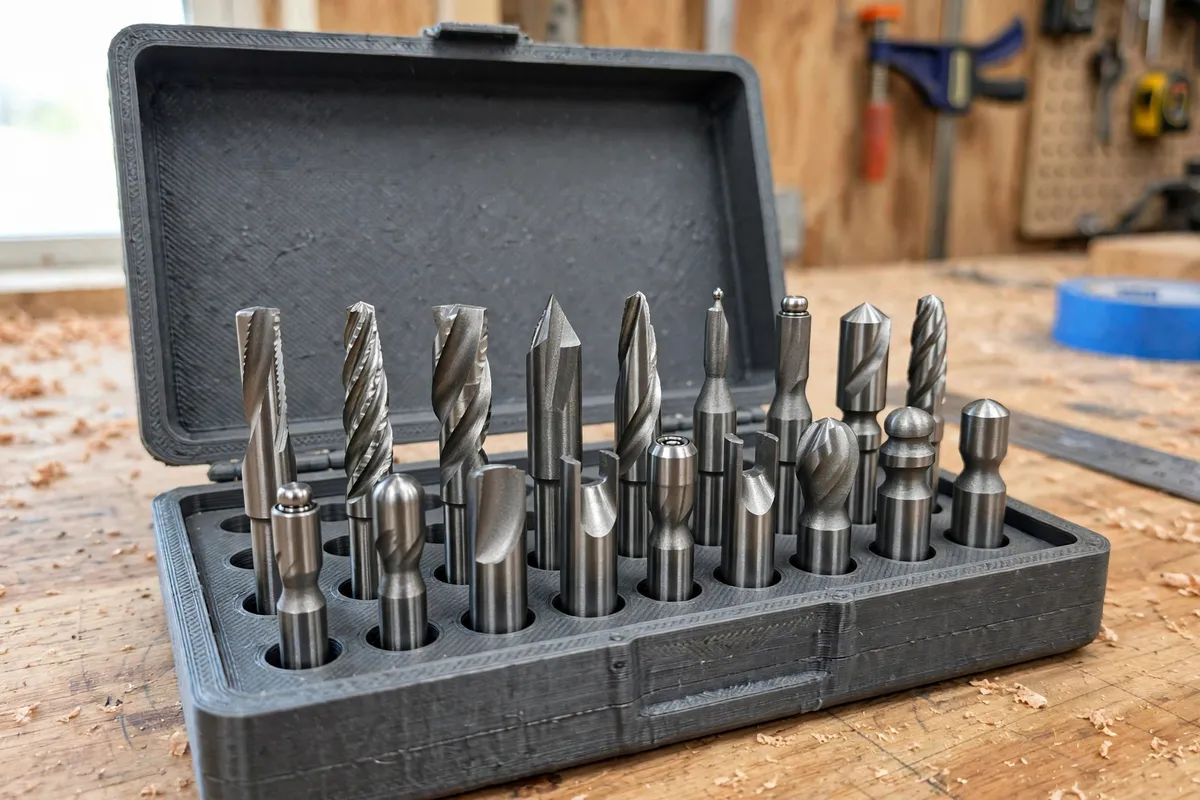
A 3D printed router bit storage case gives every bit its own fitted hole, standing upright where you can see the profile at a glance, protected by a hinged lid, in a case sized to your collection rather than a catalogue’s guess. Print a base that holds your bits by the shank — the part designed to be gripped — with each hole sized to its shank and each row spaced for the widest cutter it must clear.
This guide covers laying out a case around the bits you actually own, hinge and latch designs that survive workshop life, and printing a case that keeps carbide sharp for years.
What You Need
The case is a precision organizer: accurate shank holes and a flat, well-fitting lid matter more than raw strength. Plan for measured printing and an honest census of your bits.
Materials and tools
- A home 3D printer with a build area of roughly 200 mm or more in one direction for a useful case, or any size for modular trays
- PLA filament for a rigid, accurate case used indoors (PETG if your workshop runs hot or damp)
- Your complete router bit collection, gathered and cleaned
- Calipers for measuring shank diameters and cutter diameters
- A pencil and paper, or a simple spreadsheet, for the bit census
- Optional: a short length of 2 to 3 mm steel rod or a printed pin for the hinge, and small screws if you prefer a hardware hinge
- A fine marker or paint pen to highlight the size and profile labels
- A soft brush and a light machine oil or camellia oil for the bits before storage
The census is the project. Count every bit, note its shank (1/4 inch and 1/2 inch dominate, 6 mm and 8 mm in many regions), its cutter diameter, and its overall height. The case is designed from that list, not from hope.
Suggested print settings
- Layer height: 0.2 mm. Holes stay round and the lid lands evenly.
- Walls: 4 perimeters. Case sides and hole walls need to survive knocks in a drawer.
- Infill: 25 to 35 percent, grid or gyroid. The base block is mostly air between holes by design.
- Top and bottom layers: 4 or more, for a flat underside and a clean lid face.
- Orientation: Print the base flat, holes vertical, and the lid flat beside it. Never print hole blocks standing on edge.
- Supports: None if you keep hinge knuckles and latch features vertical-friendly.
Design Considerations
You can model the case in any basic CAD program, including free browser-based tools. Four decisions shape whether it becomes your permanent bit home or a first draft.
1. Layout: rows by shank, spaced by cutter
Arrange bits in rows grouped by shank size — all the 1/2 inch shanks together, then the 1/4 inch — because you reach for bits by job and the collet change follows the row. Space each hole from its neighbours by the largest cutter diameter in that row plus at least 8 to 10 mm of finger room: tall bits with wide cutters, like panel raisers, need their own generous corner.
Model the holes to grip the shank’s lower portion with about 0.2 to 0.3 mm of clearance — snug enough that bits stand straight and do not rattle, free enough that a cold morning does not turn removal into a tug of war. Depth around 20 to 25 mm seats standard shanks securely while leaving the cutter fully visible above the block.
2. The lid: clearance for the tallest bit
A case lid must clear the tallest bit with room to spare, or the case becomes a bit-shortening device. Measure your tallest bit’s full height above the base block and give the lid’s interior at least 5 mm beyond it. Deep lids waste space; a better trick is a raised rim on the base or a shallow dome modelled into the lid only where the tall row lives.
Add a foam or printed soft pad inside the lid if you transport the case: bits standing in holes travel fine in the workshop, but in a vehicle they appreciate a gentle lid-side cushion that stops them hopping out of their holes.
3. Hinges and latches that survive a workshop
Two hinge styles work well. A print-in-place or pin hinge along the back edge — interleaved knuckles with a steel or printed pin — opens flat and lasts for years if the knuckles are chunky, 6 mm or more in diameter. Or print base and lid separately and join them with a strip of flexible material or small hardware hinges screwed into modelled bosses: less elegant, nearly unkillable, and trivially repairable.
For the latch, a simple over-centre clip or a sliding bolt at the front centre is plenty. The case is opened on the bench, not carried by its lid — but avoid magnetic catches as the only closure; carbide does not care about magnets, yet a case that pops open when knocked off a shelf spills exactly what it exists to protect.
4. Labels: profile names where your eyes land
A bit’s profile is visible, but its size is not self-evident, and two roundover bits of different radii look identical until they cut. Model a label flat beside each hole — raised or recessed characters naming the profile and size — or a smooth pad sized for a written label if text modelling is painful. Highlight raised labels with the paint-wipe trick: a contrasting colour across the character tops makes the whole case readable in drawer light.
Leave a few spare holes in each row, labelled with their shank size only. Collections grow toward the empty holes, and a case with planned room beats a second case started in frustration.
Step-by-Step: Printing and Assembly
- Take the census: list every bit with shank, cutter diameter, and total height; sort by shank.
- Lay out the base in CAD from the census: rows by shank, spacing from the widest cutters, label flats beside each hole, spare holes included.
- Print a test strip — one short piece of hole block with three hole sizes — and fit-check your actual shanks for the right clearance before printing the whole base.
- Print the base flat with the settings above, checking the first layers carefully; a base this size warps if the bed prep is lazy.
- Print the lid to match, with its interior clearance modelled from your tallest bit.
- Assemble the hinge: pin through the knuckles, worked open and closed a dozen times to settle it, or fit your chosen hardware hinges.
- Fit the latch and test the closed case with bits inside, turned gently on its side — nothing should shift, chatter, or press on the lid.
- Label every station, highlight the labels, and load the bits shank-down with a whisper of oil on the steel.
Step-by-Step: Organizing Bits Into the Case
- Clean every bit first: brush off resin and dust, checking each edge under light as you go. Storage is also inspection — a chipped bit found now is a ruined workpiece avoided later.
- Load row by row, largest profiles where their space was planned, checking each stands straight in its hole.
- Confirm the lid clears everything by closing it slowly the first time with a sheet of paper over the tallest bits; a marked paper means not enough clearance — adjust before carbide meets lid.
- Put bearing-guided bits (roundovers, chamfers) in with bearings free of contact with neighbours; their bearings spin and should not rest against other cutters.
- Store the closed case flat in a drawer or upright on a shelf, latch forward, where it is seen and used — a case in deep storage protects bits you then forget you own.
- Adopt the one rule that keeps it working: a bit goes back in its hole before the next comes out. Ten seconds per bit, forever sharp.
Tips for Better Results
- Print the hole size test first, always. Shank nominal sizes vary just enough between brands to make untested clearances a gamble.
- Colour the rows. A different filament for each shank group’s base or label strip makes the collet decision instant.
- Ventilate against rust. In damp workshops, a small silica gel packet inside the lid keeps stored steel bright, renewed whenever it changes colour.
- Keep a “to sharpen” flag. A tiny printed clip on a bit whose edge disappointed you turns the case into a maintenance system, not just storage.
- Photograph the loaded case and tape the photo inside the lid: instant inventory when you are at the tool shop wondering what you own.
Common Mistakes to Avoid
- Spacing holes by shank alone. Two 1/4 inch shank bits can carry 12 mm and 50 mm cutters; the wide ones collide if spacing ignores cutter diameter.
- Lid clearance measured to the block, not the bit. The tallest bit decides the lid height — measure the whole assembly, not the parts.
- Holes too deep. A bit buried to its cutter is a bit you grip by the carbide to remove. Leave the cutter and a thumb’s width of shank visible.
- Skipping spare holes. A full case with a new bit homeless restarts the loose-in-drawer problem the case was built to end.
- Storing dirty bits. Resin left on an edge corrodes it quietly; clean first, store second, every time.
Care, Storage, and When to Choose an Alternative
Care for the case is a wipe and an occasional hinge check; care for the bits is the real routine — clean, oiled lightly, edges inspected, and put back in their holes without exception. Carbide treated this way lasts for years of home use.
This case is the natural sibling of our guide “3D Printed Drill Bit and Driver Bit Organizer: A Workbench Storage System That Grows With You,” and together with “3D Printed Saw Blade Storage Case: Protect Your Circular Saw Blades Between Jobs” it gives every sharp thing in the workshop the same courtesy: its own fitted, labeled place.
Sometimes another design wins. If you own three bits, a case is overkill — a foam block in a drawer does fine. Very large panel-raising bits may exceed sensible case depth and live better in individual boxes on a shelf. And a wall-mounted open rack beats a case for bits in daily production use, where every second of opening counts. For the typical growing home collection, though, the fitted case is the sharpest habit you can print.
FAQ
How much clearance should the shank holes have?
About 0.2 to 0.3 mm over the measured shank diameter. Bits should slide in with fingers only, stand straight, and lift out without rocking the case. Because brands vary slightly, print a three-hole test strip at 0.2, 0.3, and 0.4 mm clearance and choose from the real fit.
Will the plastic damage the carbide edges?
No — the bit is held by its steel shank, and the cutter touches nothing when spacing is planned by cutter diameter. Plastic is far softer than carbide in any case; the danger to edges is bit-on-bit contact in loose storage, which is precisely what the case eliminates.
Can one case hold both 1/4 inch and 1/2 inch shank bits?
Yes, and most home collections should: rows grouped by shank keep things logical, and the case simply grows a section. Keep at least a shallow divider or a change of row spacing between groups so your hand learns where one drive ends and the other begins.
How do I handle bits with guide bearings?
Seat them like any other bit, but check the bearing clears its neighbours — bearings are the widest point on many profile bits. Space those stations by bearing diameter, and never let two bearings rest against each other; a slowly crushed bearing ruins the bit it serves.
Conclusion
Sharp tools deserve sharp storage. A case modelled around your real collection — holes fitted to shanks, room planned around cutters, labels where your eyes land — ends the era of chipped carbide and mystery profiles, and turns opening the bit drawer into a small pleasure.
Take the census, print the test strip, and give every bit a home with its name on it.