Introduction
Shop rags live a messy life. They wipe glue, catch drips, clean brushes, and mop up spills, and between jobs they end up in a heap on the bench, draped over a saw, or stuffed in a drawer where they go damp and musty. A rag you cannot find is useless, and a rag left in a damp pile is unpleasant to pick up, let alone wipe a project with.
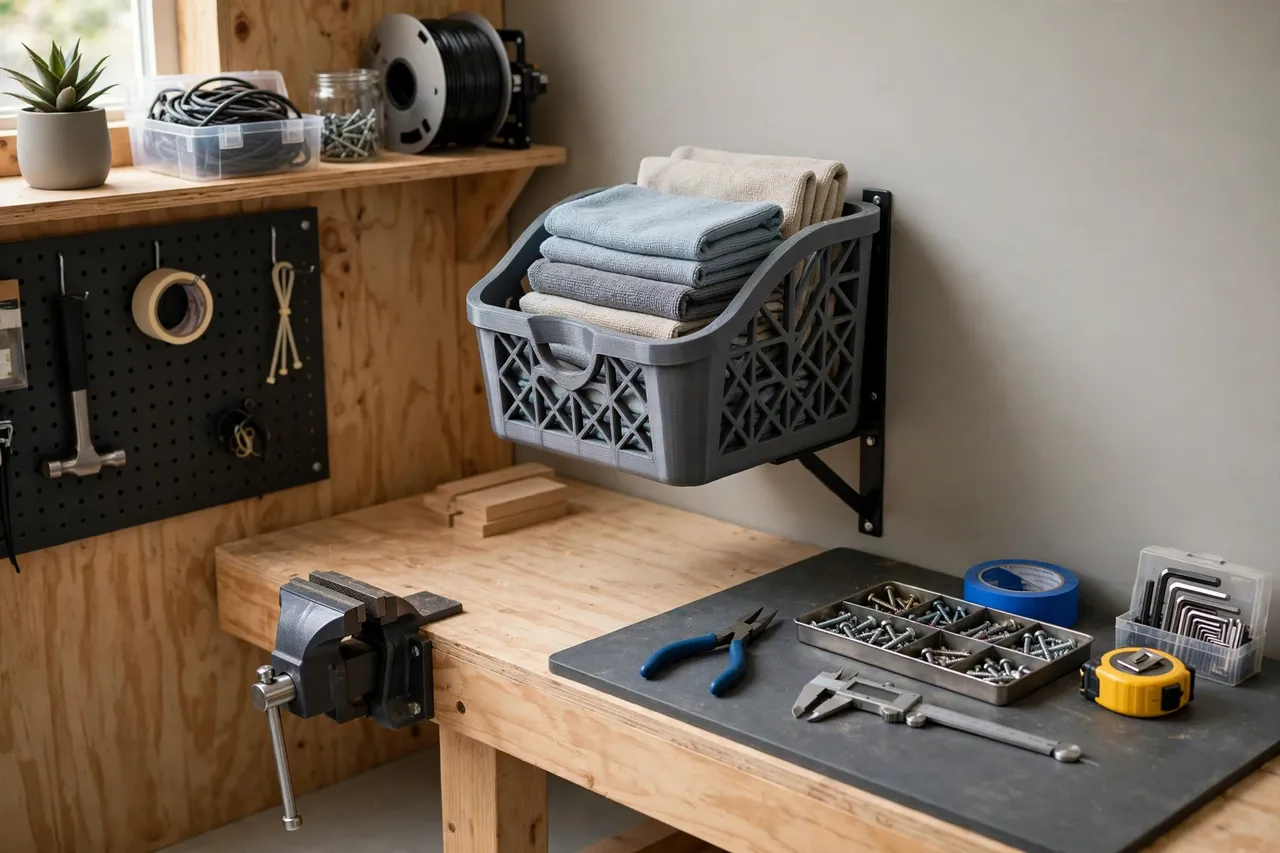
A 3D printed rag bin gives rags a single, obvious home. It is an open-top bin — printed, wall-mounted, or hung on a bench edge — sized to hold a stack of folded rags where you actually use them. Clean rags go in folded, dirty rags have their own spot, and the bench stays clear for work. It is one of the simplest organizers you can print, and one of the most used.
A safety note that matters here: this article covers a bin for ordinary dry shop rags used for wiping and cleaning. Rags soaked in oil-based finishes, solvents, or other flammable liquids need special handling — never leave them bunched in any bin, printed or otherwise. Follow the finish manufacturer’s disposal guidance for those, and keep this bin for dry and water-damp rags only.
What You Need
A rag bin is a big, simple print. If your printer is small, design the bin in panels or as a wall-mounted open basket that prints in sections and bolts together.
Materials and tools
- A home 3D printer; larger bins may need a 200 mm build area or a panel design
- PLA filament for indoor use, or PETG for a garage that gets warm or damp
- A stack of your shop rags, folded as you intend to store them, plus a ruler
- A screwdriver and screws, only for a wall-mounted or bench-edge version
- Sandpaper or a small file for smoothing the rim
- Optional: a second, smaller bin or a divider for separating clean and used rags
Measure your folded rags before modeling. A typical folded cotton shop rag is roughly 150 to 200 mm square and 15 to 25 mm thick in a stack, but rag sizes vary wildly, so design around your actual rags, not an average.
Suggested print settings
- Layer height: 0.24 mm or 0.28 mm — a bin does not need fine layers, and thicker layers print faster.
- Walls: 3 perimeters minimum; 4 if the bin will hang from a wall bracket.
- Infill: 15 to 20 percent, grid or gyroid. The bin holds light rags, not weight.
- Top and bottom layers: 4 or more, for a solid base.
- Orientation: Print upright, base down, with ventilation slots designed to print without supports where possible.
- Supports: Minimal — design slots and rims with chamfers to avoid them.
Because a bin is a large print, consider printing the walls with a slightly larger nozzle, such as 0.6 mm, if your printer supports it. It cuts print time significantly on a part this size.

Design Considerations
A rag bin is not just a box. Ventilation, access, and the clean-versus-used split are what make it work in a real shop.
1. Size and capacity
Hold about a week’s worth of rags — typically 8 to 15 folded rags for a home workshop. A bin much larger than that becomes a dumping ground; a smaller one overflows. Interior clearance of about 10 mm around the folded stack lets you pull a rag out without dragging the whole pile. If you use both large rags and small wiping cloths, a divider down the middle keeps the two sizes from tangling into one lump.
2. Ventilation
Rags stored damp go musty. Ventilation slots or a lattice pattern in the sides lets air circulate and helps rags dry between uses. Slots 8 to 12 mm wide, spaced evenly around the lower two-thirds of the bin, work well and print cleanly. Do not seal rags in a closed printed box — a closed bin traps moisture and odor, which is the opposite of what you want. An open top plus side slots is the right combination.
3. Clean and used separation
The simplest system that actually gets used is two compartments: clean rags on one side, used rags on the other, or a clean bin on the bench and a used-rag bin by the door for laundry day. A single bin with a printed divider works if bench space is tight. Whatever you choose, make the split obvious — different sizes, a divider, or even different filament colors — or the system collapses into one mixed pile within a week.
4. Mounting and placement
A bench bin sits near the finishing or assembly area, where rags are used most. A wall-mounted bin hangs beside the bench at hip height, keeping rags off the work surface entirely. A bench-edge hook version clips over the bench edge and moves with the job. Wall mounting needs a sturdy bracket and screws into a stud or anchors, since a full bin of damp rags is heavier than it looks. This wall-hung approach pairs well with other wall organizers such as 3D Printed Tape Measure Rack: Measures Hung in a Row for a bench area where everything has its place.
Step-by-Step: Printing and Assembly
- Fold and measure your rags. Stack ten folded rags and measure the stack’s footprint and height.
- Choose the bin style. Bench bin, wall bin, or bench-edge hook, and single or divided.
- Model the bin. An open-top container with ventilation slots, walls 3 to 4 mm thick, and a rim thick enough to grab.
- Add mounting features if needed. Keyhole slots or a bracket flange for wall versions, a hook lip for bench-edge versions.
- Print in sections if your printer is small. Panel designs with bolted or glued joints work fine for a bin.
- Clean up the rim and slots. Sand the rim smooth — you will reach into this bin constantly, and rough edges snag rags.
- Assemble and mount. Bolt panels together if applicable, then mount the bin level and test it with a full load of rags.
- Load it properly. Clean rags folded on one side, used rags on the other, and nothing else in the bin.
Step-by-Step: Using It
- Fold clean rags before they go in. A folded rag stacks neatly and pulls out without unfolding the whole pile.
- Grab from the top, return to the used side. The habit is simple: clean side out, used side back.
- Shake out used rags outdoors before they go in the used compartment, so sawdust does not build up in the bin.
- Empty the used side on laundry day. Do not let used rags sit for weeks — they go musty and the bin stops being inviting to use.
- Wipe the bin occasionally. A quick brush-out removes lint and dust that collect in the ventilation slots.
- Keep oily or solvent-soaked rags out entirely. Those go straight to proper disposal per the product’s instructions, never into this bin, even briefly.
The bin works when the routine is easy. If the bin is far from where rags are used, rags will end up on the bench again, so place it at the point of use, not in a tidy but distant corner.
Tips for Better Results
- Print the rim in a contrasting color. A bright rim makes the bin visible and signals “rags go here” at a glance.
- Add a small handle or finger cutout. A cutout near the top makes a wall bin easier to lift off its bracket for cleaning.
- Taper the walls slightly outward. A slight draft angle makes printing easier and lets you nest or stack spare bins.
- Use mesh or lattice sides for heavy use. If your rags are often damp, a more open lattice dries them faster than narrow slots.
Common Mistakes to Avoid
- Printing a sealed box. Closed rag storage traps moisture and odor. Ventilation is not optional.
- Making the bin too big. An oversized bin becomes a junk bin within a month. Size it for a week’s rags and empty it weekly.
- Mixing clean and used rags. Without a divider or a second bin, the system fails — a dirty rag wipes a finished surface and ruins the work.
- Storing solvent-soaked rags in the bin. This is a genuine fire-safety issue with oil-based finishes and solvents. Keep those rags out of any enclosed or piled storage and dispose of them as the product directs.
- Mounting weakly. A wall bin full of damp rags pulls hard on its screws. Use a stud or proper wall anchors, not adhesive strips.
Care, Storage, and When to Choose an Alternative
Brush lint out of the bin weekly, wipe it with a damp cloth when grimy, and keep PLA bins out of direct sun and extreme heat. If a wall bracket cracks or a rim chips, reprint just that part — a bin is easy to repair in sections.
Choose a different solution if you generate large volumes of rags, such as in a busy finishing shop; a lidded metal container or a commercial rag hamper handles volume and fire safety better at that scale. For a home workshop’s daily rag use, though, a printed bin is ideal, and it rounds out a bench organization system that might also include 3D Printed Marker Holders: Holders for Shop Markers for the small items that otherwise clutter the same bench.
FAQ
How many rags should the bin hold?
About a week’s worth for your shop — typically 8 to 15 folded rags. That keeps the bin manageable and forces a regular laundry cycle, which keeps rags fresh.
Can I put damp rags in the bin?
Water-damp rags are fine in a ventilated bin, since airflow helps them dry. Do not put solvent- or oil-soaked rags in this bin at all; dispose of those separately per the product instructions.
Will the bin work for paper towels as well as cloth rags?
It works as a holder, but paper towels tear when pulled from a deep bin. Keep a separate roll holder for paper towels and reserve the bin for cloth rags.
My rags smell musty even in the ventilated bin. What helps?
Wash the rags more often, widen the ventilation slots, and move the bin somewhere with better airflow. Mustiness means rags are staying damp too long — the fix is faster turnover, not a bigger bin.
Conclusion
A rag bin is about as simple as a workshop print gets, and it is used every single day. Folded rags in one place, used rags in another, the bench clear, and no more hunting through a drawer for a clean wiping cloth. That small daily convenience adds up across every project.
Measure your rags, print a ventilated bin that fits them, and put it where rags are actually used. It is a quick print that makes the whole workshop feel more organized — and it keeps the rags you reach for clean, dry, and ready.