Introduction
Open almost any flat-pack or European-style cabinet and you will find rows of neat 5mm shelf-pin holes. Open your parts drawer and you will find a handful of sturdy 1/4-inch shelf pins — bought for another bookcase, left over from a repair, or simply the only size the hardware store had. The pins are excellent. The holes are excellent. They just do not agree: a 1/4-inch pin is about 6.35 mm, and it will not enter a 5mm hole.
The usual fix is to drill the holes out larger, which feels wrong the moment you think about it. Drilling is permanent, it has to be done perfectly straight dozens of times, and in melamine or veneered board one wandering bit chips the surface around every hole. The other fix — hunting down genuine 5mm pins — works only until you need the stronger pin, the spoon-style rest, or the pin you already own.
A 3D printed shelf pin sleeve takes the third path — with one honest clarification. A sleeve cannot shrink a 1/4-inch pin into a 5mm hole; physics still applies, and that pairing needs the correct 5mm pin or a redrilled hole. What a sleeve does brilliantly is everything around that pairing: it adapts a hole to its pin with a precise, centered fit, and it rescues the far more common failure — holes worn loose and oval, where the original 5mm pins now rattle, tilt, and chew the holes larger with every loaded shelf.
Sized to your exact hole and your exact pin, a printed sleeve bridges small mismatches of a few tenths of a millimeter, centers the pin, spreads its load over the full hole depth, and stops the wobble. If you keep 1/4-inch pins for other furniture, the same sleeve system — printed as a stepped support collar for the shelf itself — keeps each storage system working with the pins it can properly use, instead of forcing one standard onto the other. This guide covers measuring your holes and pins and printing sleeves that sit solid. The sleeves support ordinary household shelves — books, dishes, and linens — not heavy structural loads.
What You Need
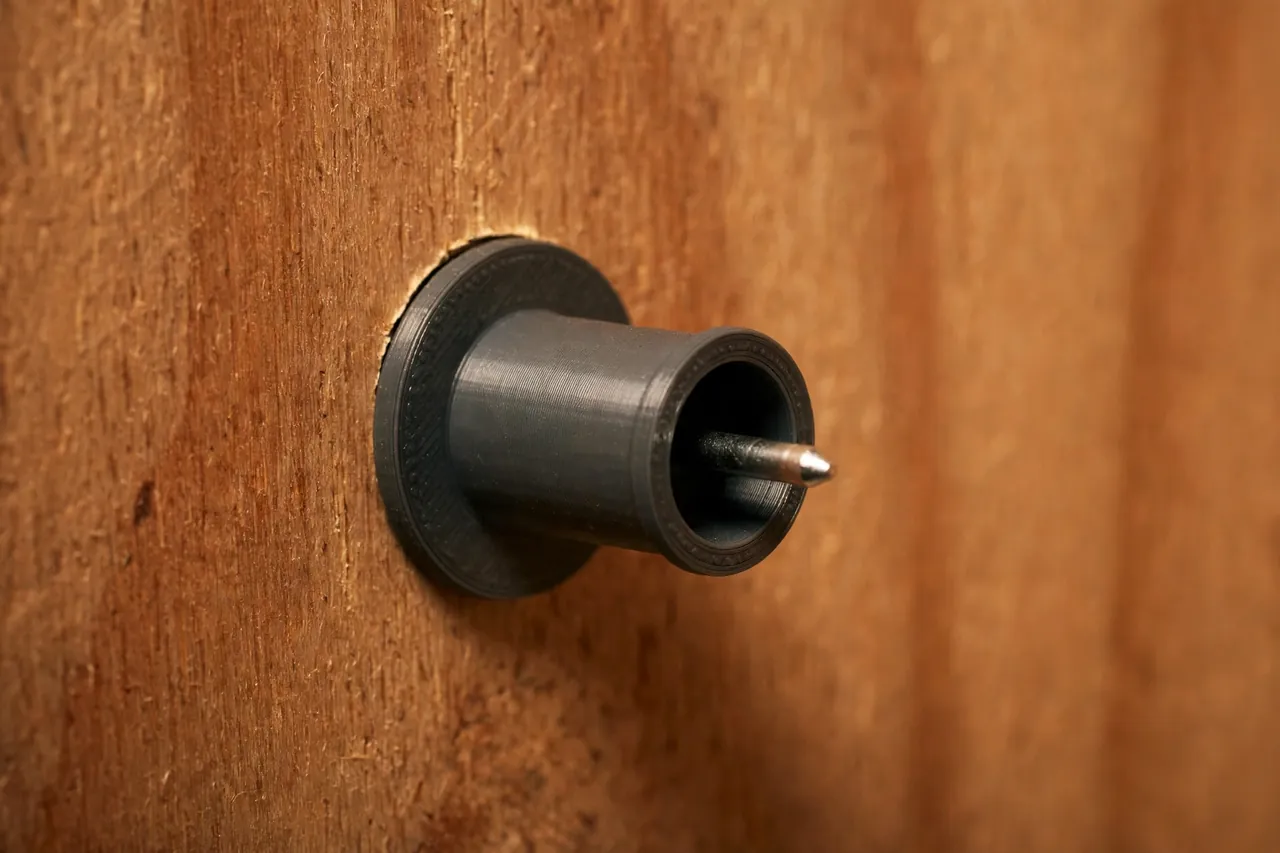
A sleeve is a tiny print — a short tube with a flange — and a cabinet’s worth prints in an hour.
Materials and tools
- A home 3D printer; even a small build plate fits dozens of sleeves at once
- PETG filament for a little flex during fitting, or PLA for crisp test sizes
- The actual shelf pins you intend to use, plus access to the cabinet’s holes
- Calipers — sleeve fitting is a game of tenths of a millimeter
- A ruler or depth gauge to measure hole depth and board thickness
- A small file or fine sandpaper for final adjustment
- A mallet or thumb pressure for seating sleeves; no drilling required
PETG is the better keeper material: it presses into a tight hole without cracking. Print your size ladder in PLA for crisp tests, find the perfect fit, then run the final set in PETG, allowing a hair more clearance.
Suggested print settings
- Layer height: 0.16 to 0.20 mm — small parts deserve the accuracy.
- Walls: Print sleeves essentially solid: 4 or more perimeters on such a small tube means no weak infill core.
- Infill: 100 percent or walls-only solid; the part is tiny.
- Top and bottom layers: Enough to make the flange fully solid, typically 4 or more.
- Orientation: Print upright, flange down on the bed, so both bores print perfectly round.
- Supports: None — the shape is a simple tube with a flange.
Print a size ladder first: five sleeves stepping by 0.1 mm around your calculated size.
Design Considerations
You can model a sleeve in any basic CAD program in minutes. The dimensions, however, deserve real care.
1. Measure both sides of the mismatch
Measure your hole’s true diameter — not its nominal size. A 5mm hole in particleboard may now measure 5.2 mm, and a worn one can be oval. Measure at the surface and deeper in, then measure your pin’s stem the same way. The sleeve’s outer diameter matches the hole, its inner diameter matches the pin, with ideally 0.8 mm or more of wall between.
Where the mismatch is small — say a 5mm pin in a hole worn to 5.6 mm — the sleeve is a simple thin-walled tube. Model what you measured, not what the catalog promised.
2. Fit targets for each side
The outer fit should be a light press: about 0.1 to 0.2 mm of interference, seating with firm thumb pressure and staying when the pin is removed. The inner fit should be a snug slip: 0.15 to 0.3 mm of clearance, so pins move by hand but do not rattle. Add a gentle lead-in chamfer at both ends.
3. The flange does three jobs
The flange — a disc about 2 to 3 mm wider than the body and 1 to 1.5 mm thick — stops the sleeve pushing through, gives you a face to tap against, and covers minor chipping around the hole mouth. Keep it thin; on a shelf sleeved at all four corners, matching flanges keep everything level automatically.
4. Sleeve length and hole depth
Match sleeve length to the board: for a typical 16 to 19 mm side, a 12 to 15 mm sleeve supports the pin fully. Measure hole depth first — a sleeve that bottoms out and stands proud will tilt the pin and rock the shelf.
Step-by-Step: Printing and Assembly
- Measure your holes at surface and depth, in two directions, and note the largest reading.
- Measure your pin stems the same way.
- Model the sleeve with your outer press fit, inner slip fit, flange, and chamfers.
- Print a size ladder of five variants stepping 0.1 mm in outer diameter.
- Test each in a real hole at the back of the cabinet where a mistake will not show.
- Choose the winner: seats with firm pressure, pin slips in snugly, no rocking.
- Print the full set in PETG at the winning dimensions, plus spares.
- Seat all sleeves with thumb pressure or light mallet taps through a scrap block.
- Insert the pins and set the shelf, then load it gradually and check for level.
Step-by-Step: Using Sleeves to Fix a Wobbly Shelf
- Empty and remove the shelf and pull the old pins.
- Inspect each hole. Brush out dust and crumbs; note any that are badly ovaled.
- Test a sleeve in the worst hole first — if it fits there, the rest will be easy.
- Seat sleeves in all four holes (or however many the shelf uses), flanges flush.
- Insert the pins and confirm each stands straight and at the same height.
- Replace the shelf and press down at each corner, feeling for rock.
- Load the shelf in stages, heaviest items centered over the cabinet sides.
- Recheck after a day of real load; a correct sleeve setup does not shift.
Tips for Better Results
- Print spares in the same batch. Sleeves vanish during moves; a bag of ten costs minutes.
- Use a contrasting color. Orange sleeves are easy to spot when checking whether a hole is sleeved or bare.
- Keep the size ladder. It converts every future cabinet into a two-minute fitting job.
- Seat sleeves with a block, not direct mallet hits, to keep flanges flat and unchipped.
- Sleeve all four corners of a shelf even if only two holes are worn, so pin heights match exactly.
If you are drilling fresh, even holes for new shelves instead, you may also enjoy our related guide, “Shelf Pin Drilling Jig: 3D Print a Cabinet Shelf Jig for Perfectly Even Pin Holes,” which covers the drilling side of shelf work.
Common Mistakes to Avoid
- Trusting nominal sizes. A “5mm” hole that has lived a life may be 5.5 mm and oval. Measure the hole you have.
- Making the outer fit too loose. A slip-fit sleeve walks out with the pin and ends up lost in the cabinet.
- Making the inner fit too tight. Forcing pins splits thin sleeve walls along layer lines.
- Ignoring hole depth. A bottomed-out sleeve stands proud, tilts the pin, and rocks the shelf.
- Sleeving only one corner. Mixed heights across a shelf guarantee a wobble, however good each sleeve is.
Care, Storage, and When to Choose an Alternative
Sleeves need almost no care. When you remove pins to move a shelf, check that sleeves stay seated; one that comes out with the pin wants a 0.1 mm larger reprint. Store spares labeled with the cabinet they fit.
Be honest about load and damage. Shelves for heavy workshop loads, aquariums, or anything a person might climb or lean on deserve manufactured metal pins in sound, correctly drilled holes — or proper fixed joinery — not printed adapters. Badly blown-out holes need the plug-and-redrill repair first. And if your cabinet uses a metal pilaster strip system rather than plain holes, sleeves do not apply at all; that system has its own clips, covered in our related guide, “3D Printed Pilaster Shelf Clips: Replace Lost Shelf Strip Clips in Minutes.” For ordinary bookcases and kitchen cabinets with sound holes and a size mismatch, printed sleeves are the tidy, reversible, drill-free answer — and they play the same supporting role as our related guide, “3D Printed Leveling Shims and Wedges for Wobbly Tables, Cabinets and Shelves,” in keeping furniture sitting true.

FAQ
Can a sleeve really make different pin systems work together?
Within small differences, yes — a few tenths of a millimeter to about a millimeter, keeping the pin centered. It cannot shrink a large pin into a much smaller hole; that needs the correct pin or a redrilled hole.
Why not just buy the correct pins?
Often you should, if they are available. Sleeves earn their place when holes have worn loose for their original pins, or when the pins you own are stronger or spoon-rested and worth keeping in service.
Will printed sleeves hold a shelf of books?
Yes, in sound holes with correct fits, for ordinary household shelving. Keep heavy loads centered, use all four supports, and choose metal hardware for exceptional weights.
What if my holes are oval from years of wobble?
An oval hole needs a slightly larger round sleeve, sometimes locked with a tiny drop of glue — or, if damage is severe, the plug-and-redrill repair. Test in the worst hole first.
Conclusion
A wobbly shelf is rarely a broken cabinet. It is usually a few tenths of a millimeter of disagreement between a hole and a pin — and a few tenths of a millimeter is exactly what a 3D printer is good at. A measured, flanged sleeve restores a snug, centered fit with no drilling, no chipped melamine, and no compromise.
Print a size ladder, find your perfect fit, and run a set with spares. Every shelf in the house can sit level and silent again by tonight.